how to draw a 3d box in java
Putting together a 3D scene in the browser with Three.js is similar playing with Legos. We put together some boxes, add lights, define a camera, and Three.js renders the 3D paradigm.
In this tutorial, we're going to put together a minimalistic car from boxes and acquire how to map texture onto it.
Get-go, nosotros'll set things upwardly – nosotros'll define the lights, the camera, and the renderer. And then nosotros'll learn how to define geometries and materials to create 3D objects. And finally nosotros are going to code textures with JavaScript and HTML Canvas.
How to Setup the Three.js Projection
3.js is an external library, and so first we demand to add it to our projection. I used NPM to install information technology to my project then imported information technology at the beginning of the JavaScript file.
import * equally THREE from "three"; const scene = new THREE.Scene(); . . . Starting time, we need to define the scene. The scene is a container that contains all the 3D objects we desire to display along with the lights. We are most to add together a car to this scene, but commencement allow's gear up the lights, the camera, and the renderer.
How to Set Up the Lights
Nosotros'll add two lights to the scene: an ambient light and a directional light. We define both past setting a color and an intensity.
The color is defined equally a hex value. In this instance we set it to white. The intensity is a number between 0 and 1, and as both of them shine simultaneously nosotros desire these values somewhere around 0.5.
. . . const ambientLight = new THREE.AmbientLight(0xffffff, 0.six); scene.add(ambientLight); const directionalLight = new THREE.DirectionalLight(0xffffff, 0.8); directionalLight.position.set(200, 500, 300); scene.add(directionalLight); . . . The ambient lite is shining from every direction, giving a base color for our geometry while the directional low-cal simulates the sun.
The directional light shines from very far away with parallel light rays. Nosotros set a position for this lite that defines the direction of these lite rays.
This position can be a chip confusing so allow me explain. Out of all the parallel rays we define one in particular. This specific light ray will shine from the position nosotros define (200,500,300) to the 0,0,0 coordinate. The rest will be in parallel to it.
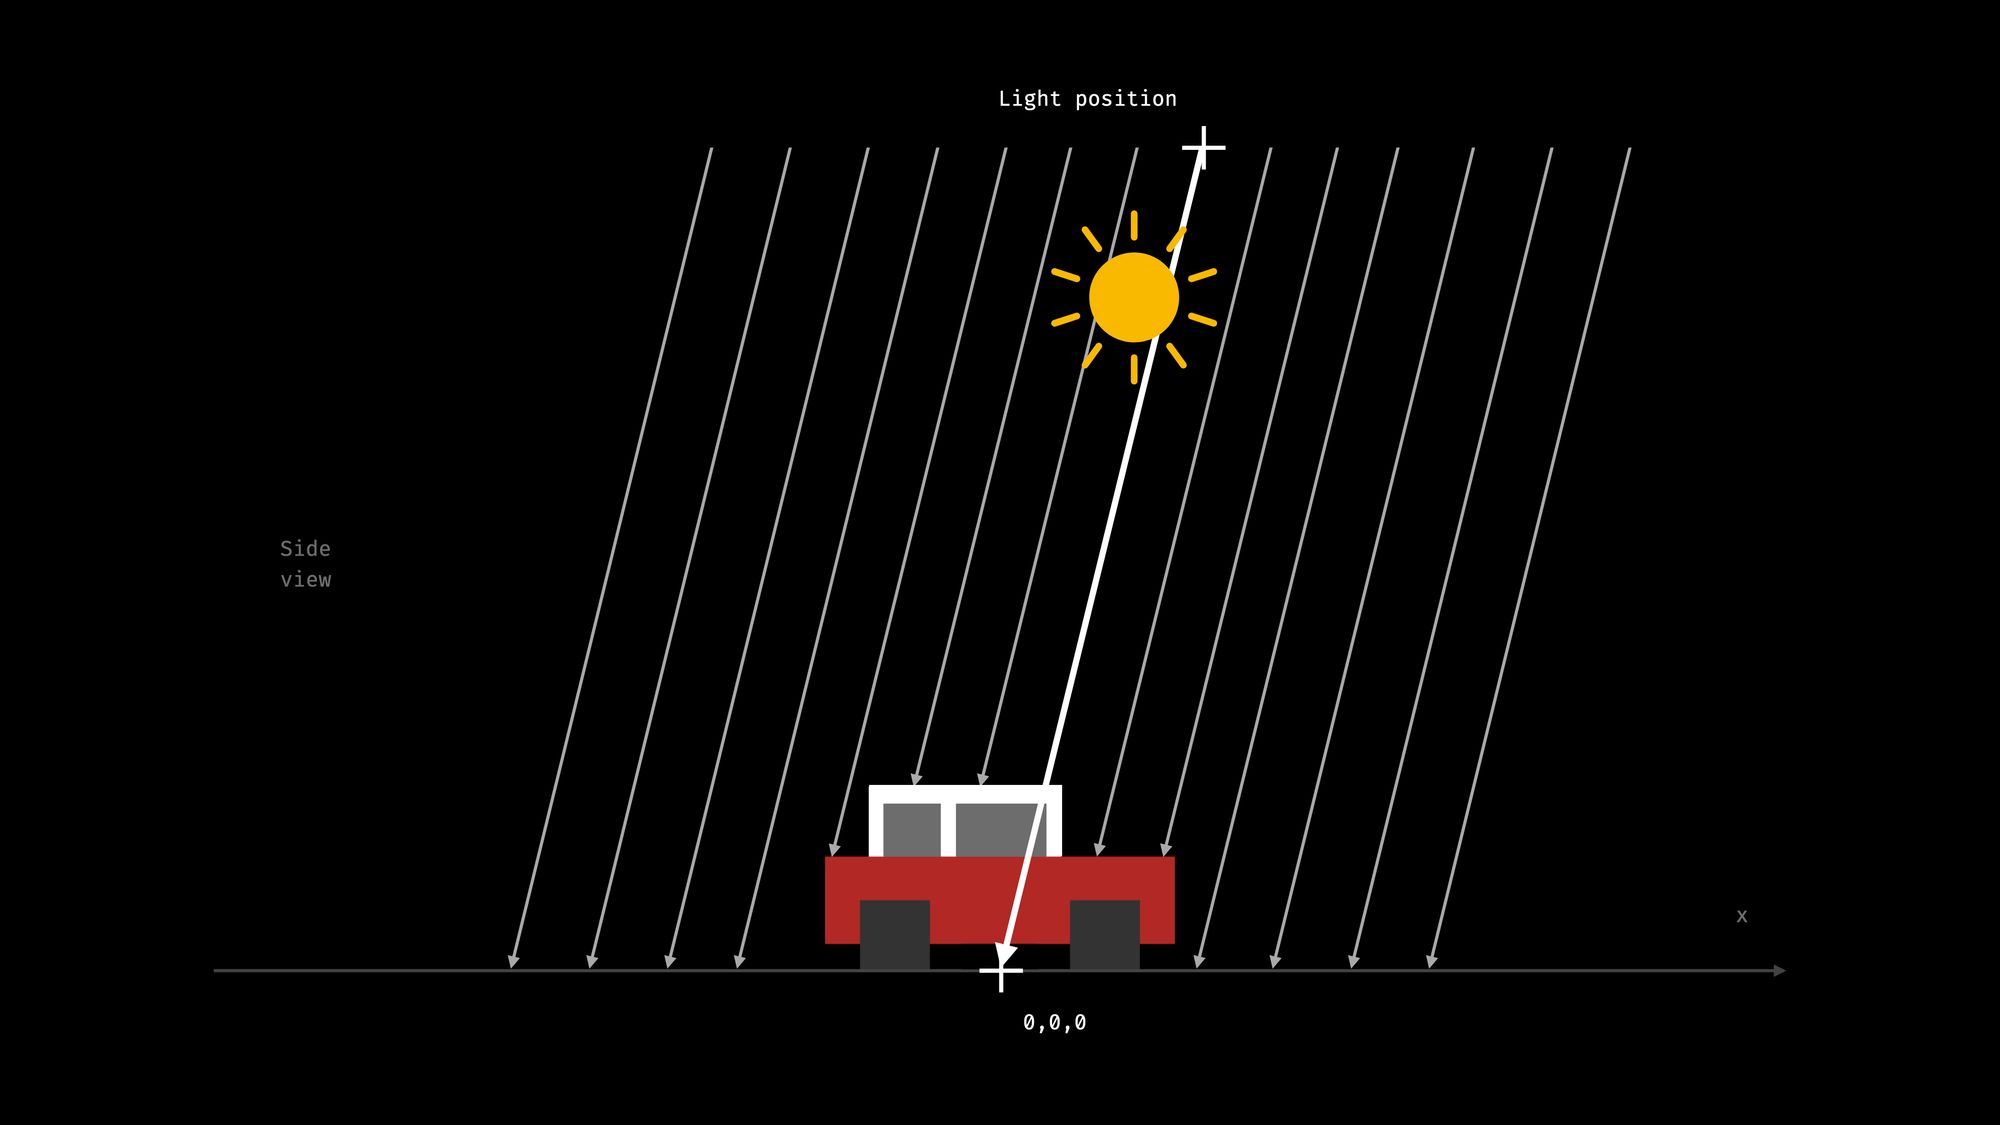
As the low-cal rays are in parallel, and they smooth from very far away, the verbal coordinates don't matter here – rather, their proportions practise.
The 3 position-parameters are the X, Y, and Z coordinates. By default, the Y-axis points upwards, and as it has the highest value (500), that ways the top of our car receives the most light. So it volition exist the brightest.
The other two values define by how much the light is bent along the X and Z axis, that is how much light the front and the side of the car will receive.
How to Set Up the Camera
Next, let's set up the camera that defines how we look at this scene.
There are 2 options here – perspective cameras and orthographic cameras. Video games mostly use perspective cameras, but nosotros are going to utilise an orthographic one to have a more minimal, geometric look.
In my previous article, we discussed the differences between the two cameras in more item. Therefore in this i, nosotros'll only talk over how to fix upwardly an orthographic camera.
For the camera, we need to ascertain a view frustum. This is the region in the 3D space that is going to be projected to the screen.
In the case of an orthographic camera, this is a box. The camera projects the 3D objects within this box toward one of its sides. Because each projection line is in parallel, orthographic cameras don't distort geometries.
. . . // Setting upward camera const aspectRatio = window.innerWidth / window.innerHeight; const cameraWidth = 150; const cameraHeight = cameraWidth / aspectRatio; const photographic camera = new Iii.OrthographicCamera( cameraWidth / -two, // left cameraWidth / 2, // right cameraHeight / 2, // top cameraHeight / -ii, // bottom 0, // almost plane 1000 // far airplane ); camera.position.prepare(200, 200, 200); camera.lookAt(0, 10, 0); . . . To set upward an orthographic camera, we accept to ascertain how far each side of the frustum is from the viewpoint. We define that the left side is 75 units abroad to the left, the correct aeroplane is 75 units away to the right, so on.
Here these units don't represent screen pixels. The size of the rendered image will exist divers at the renderer. Here these values accept an arbitrary unit that we use in the 3D space. Afterward on, when defining 3D objects in the 3D space, we are going to utilize the same units to fix their size and position.
Once we define a photographic camera we also need to position it and turn it in a direction. We are moving the camera past 200 units in each dimension, then we set it to await back towards the 0,ten,0 coordinate. This is virtually at the origin. We await towards a bespeak slightly above the basis, where our car'south center will be.
How to Ready Up the Renderer
The last piece we need to set upward is a renderer that renders the scene according to our photographic camera into our browser. We ascertain a WebGLRenderer similar this:
. . . // Set upwards renderer const renderer = new Three.WebGLRenderer({ antialias: true }); renderer.setSize(window.innerWidth, window.innerHeight); renderer.render(scene, camera); document.body.appendChild(renderer.domElement); Here we besides ready the size of the sail. This is the simply place where we prepare the size in pixels since we're setting how it should announced in the browser. If we desire to fill the whole browser window, we pass on the window's size.
And finally, the last line adds this rendered image to our HTML document. It creates an HTML Canvas element to display the rendered image and adds it to the DOM.
How to Build the Motorcar in Three.js
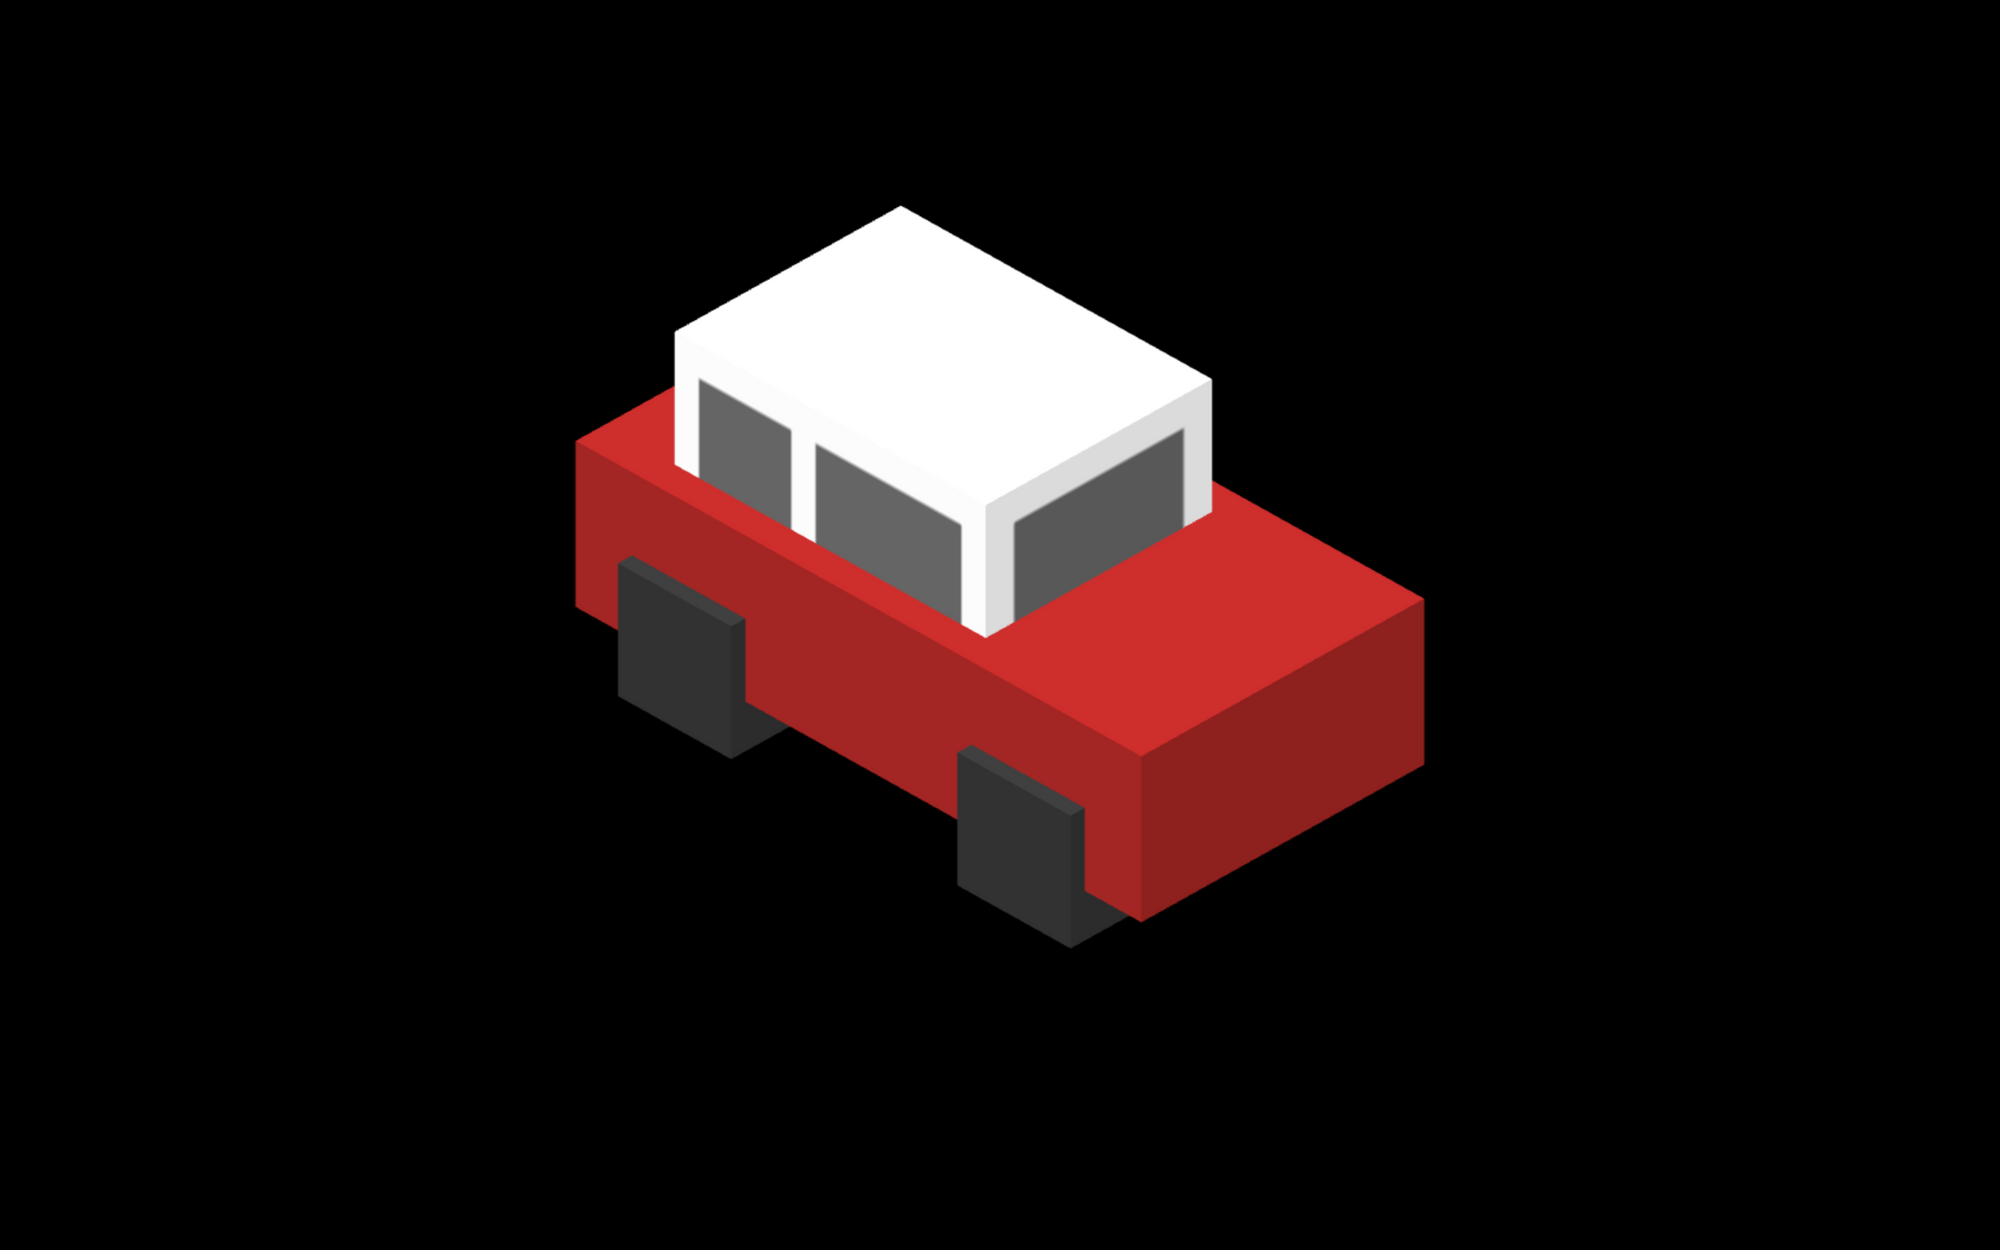
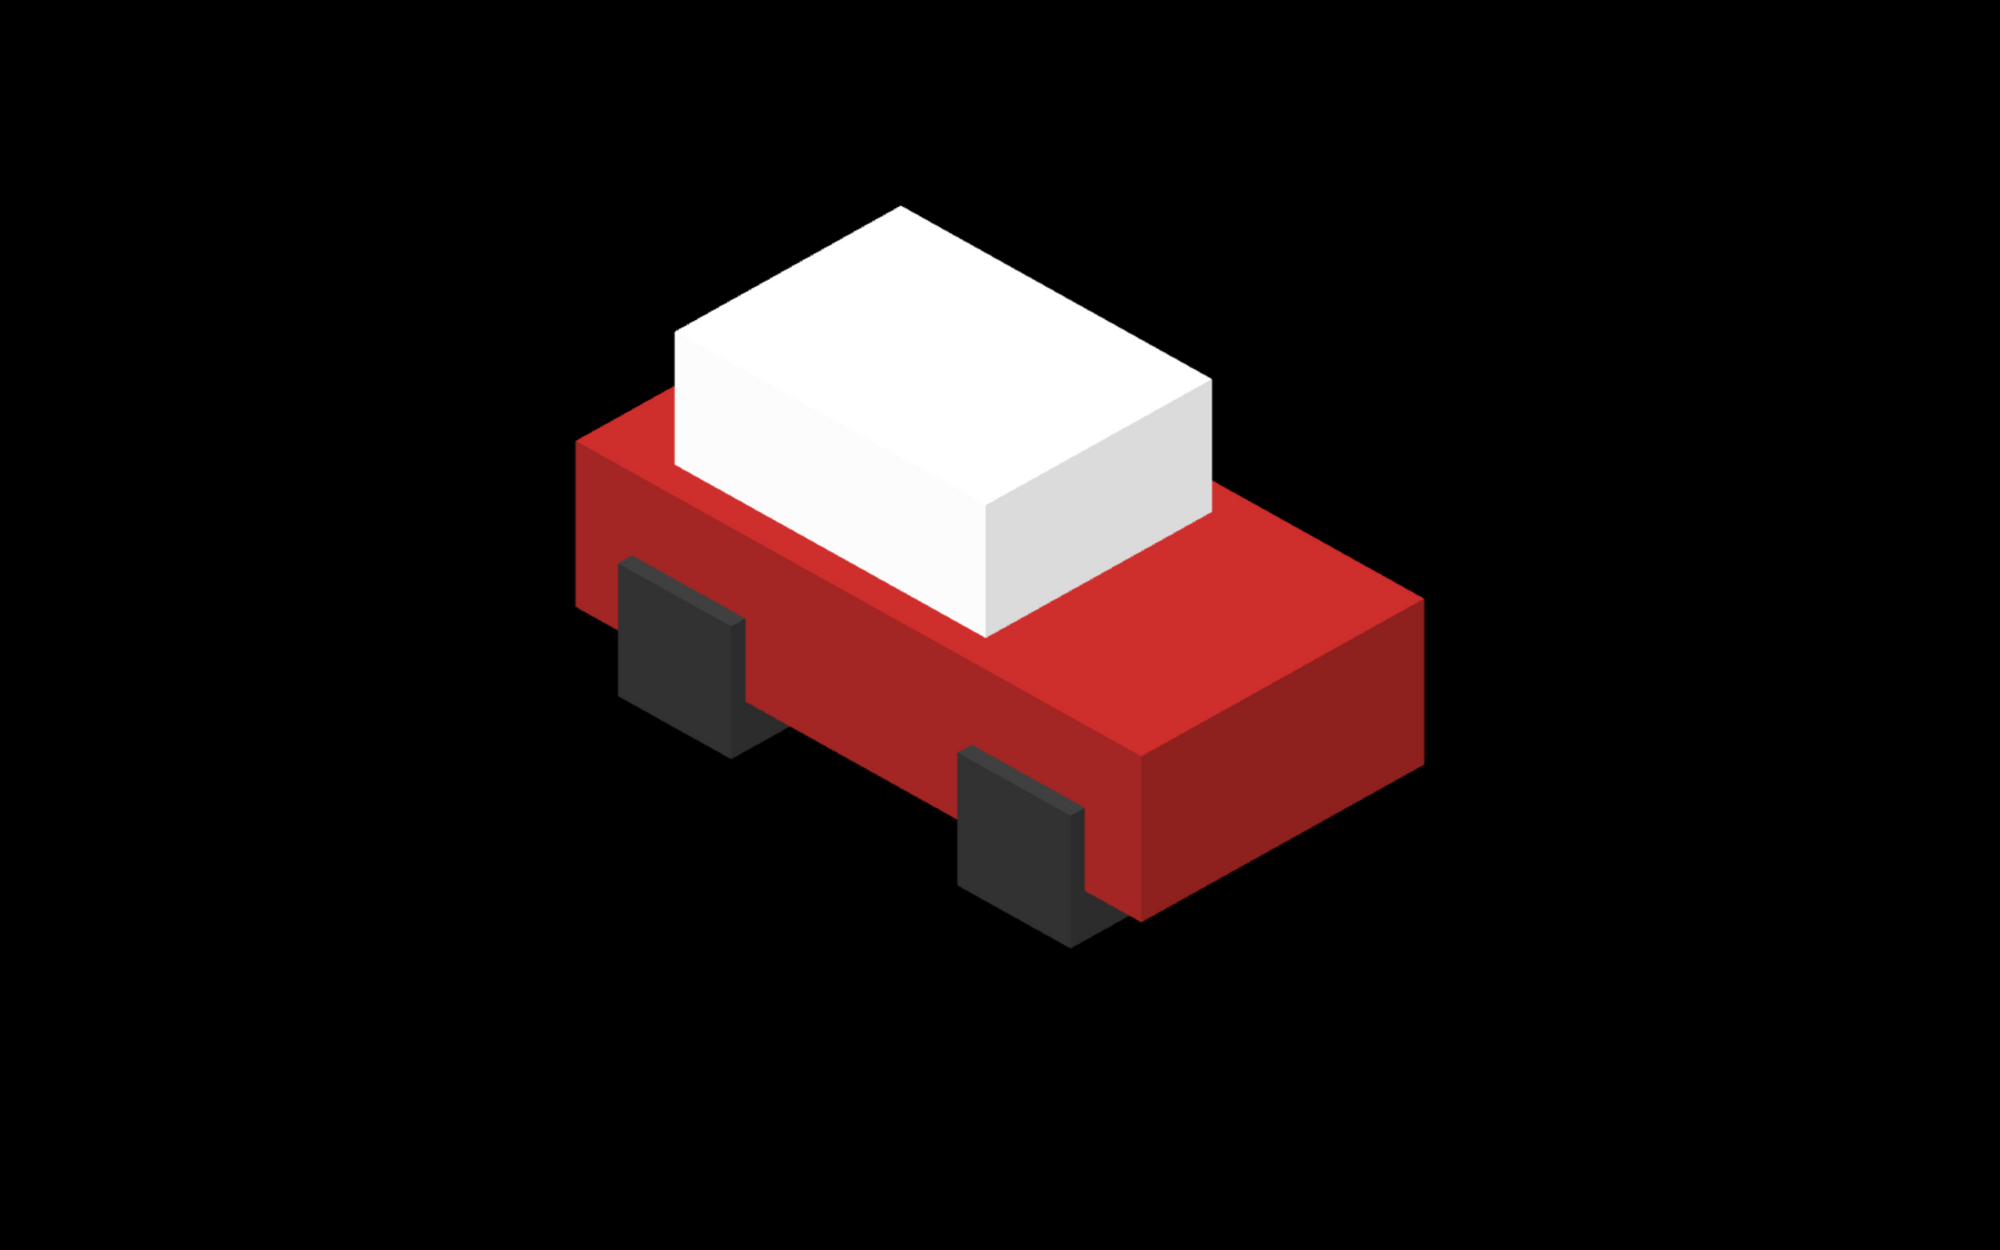
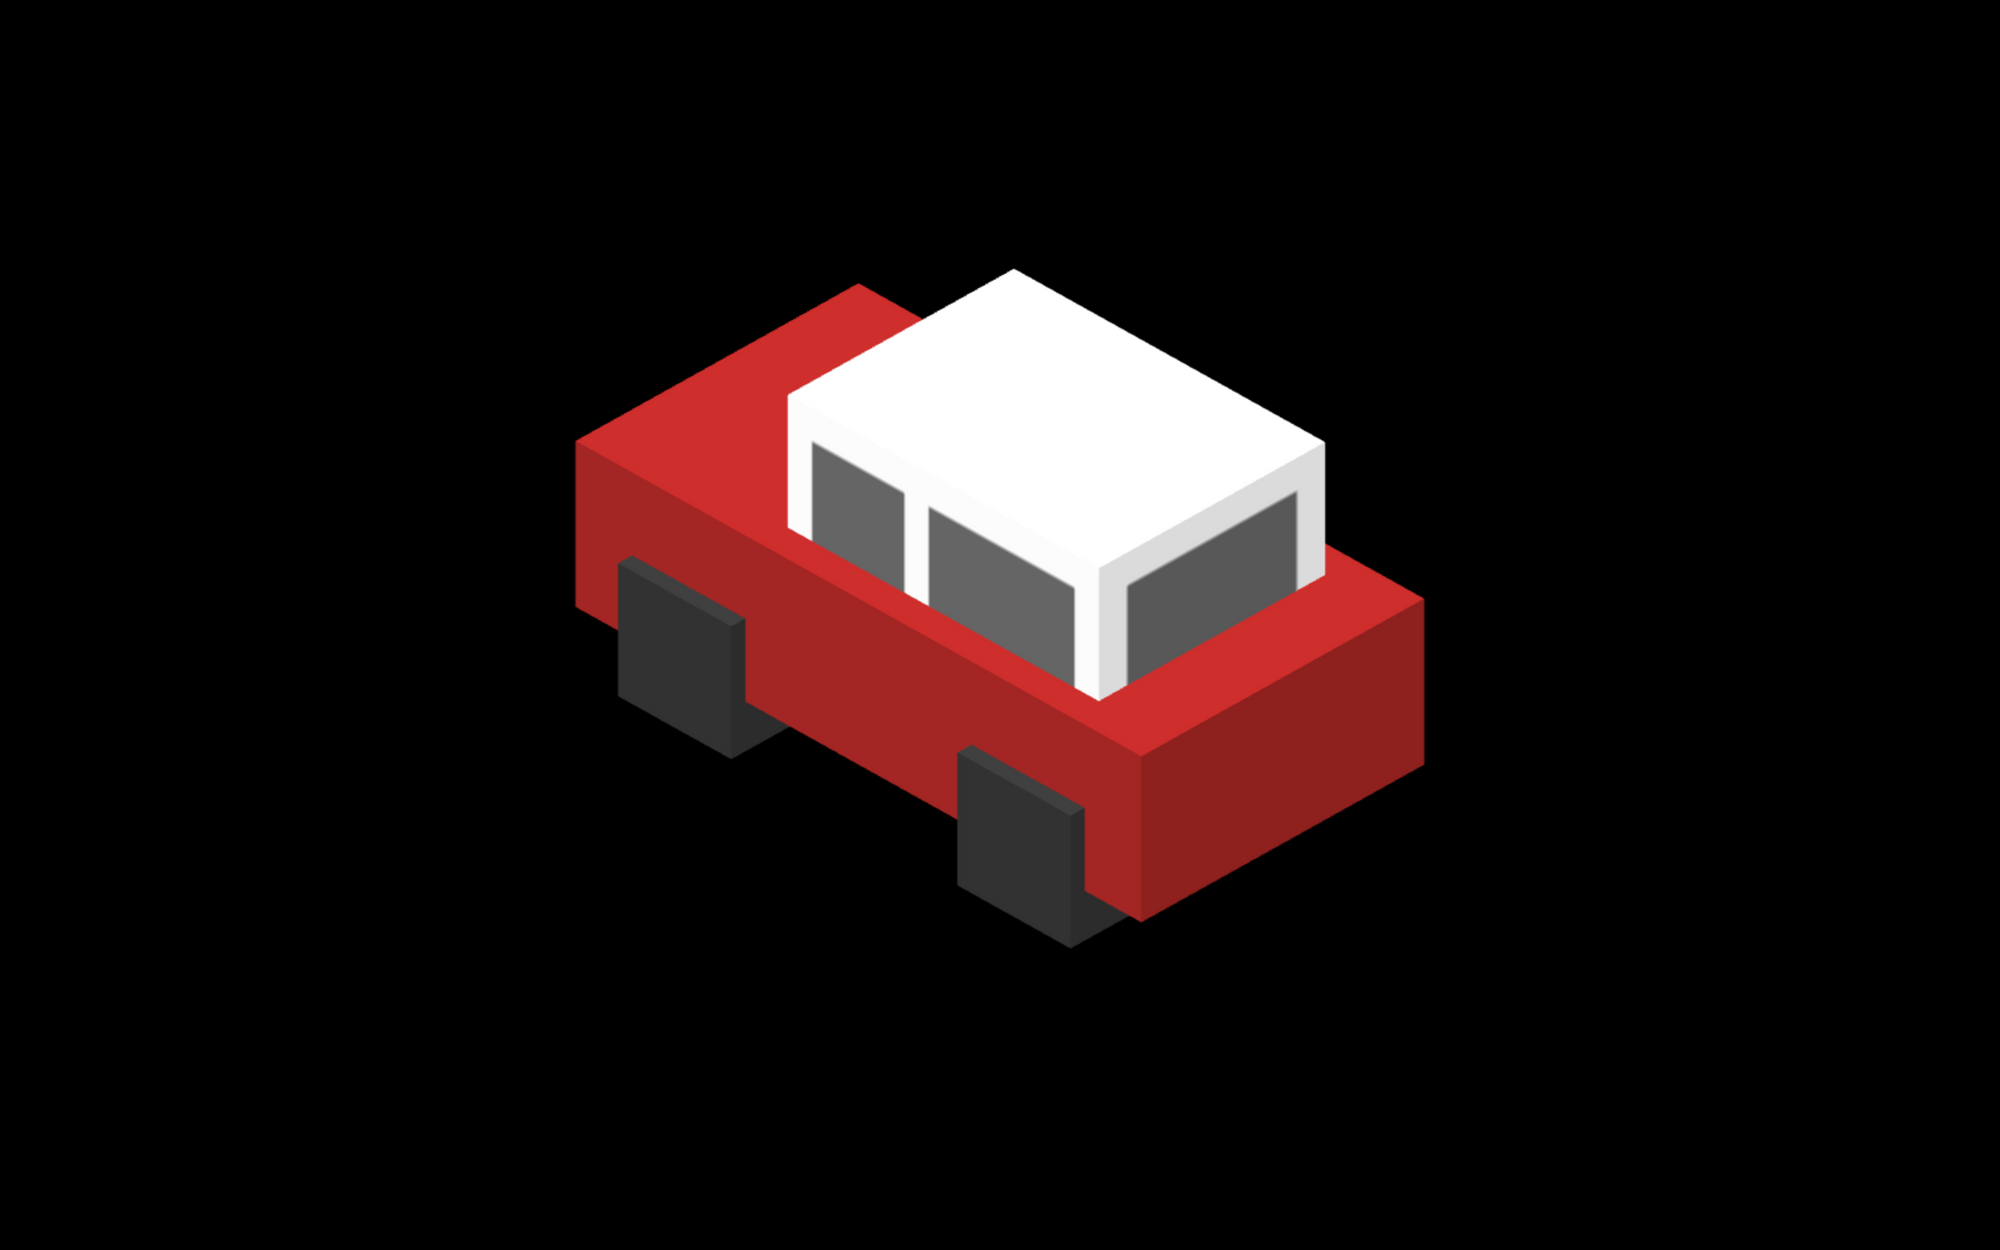
At present let'south meet how can nosotros tin compose a car. First, we will create a car without texture. It is going to be a minimalistic blueprint – we'll simply put together four boxes.
How to Add a Box
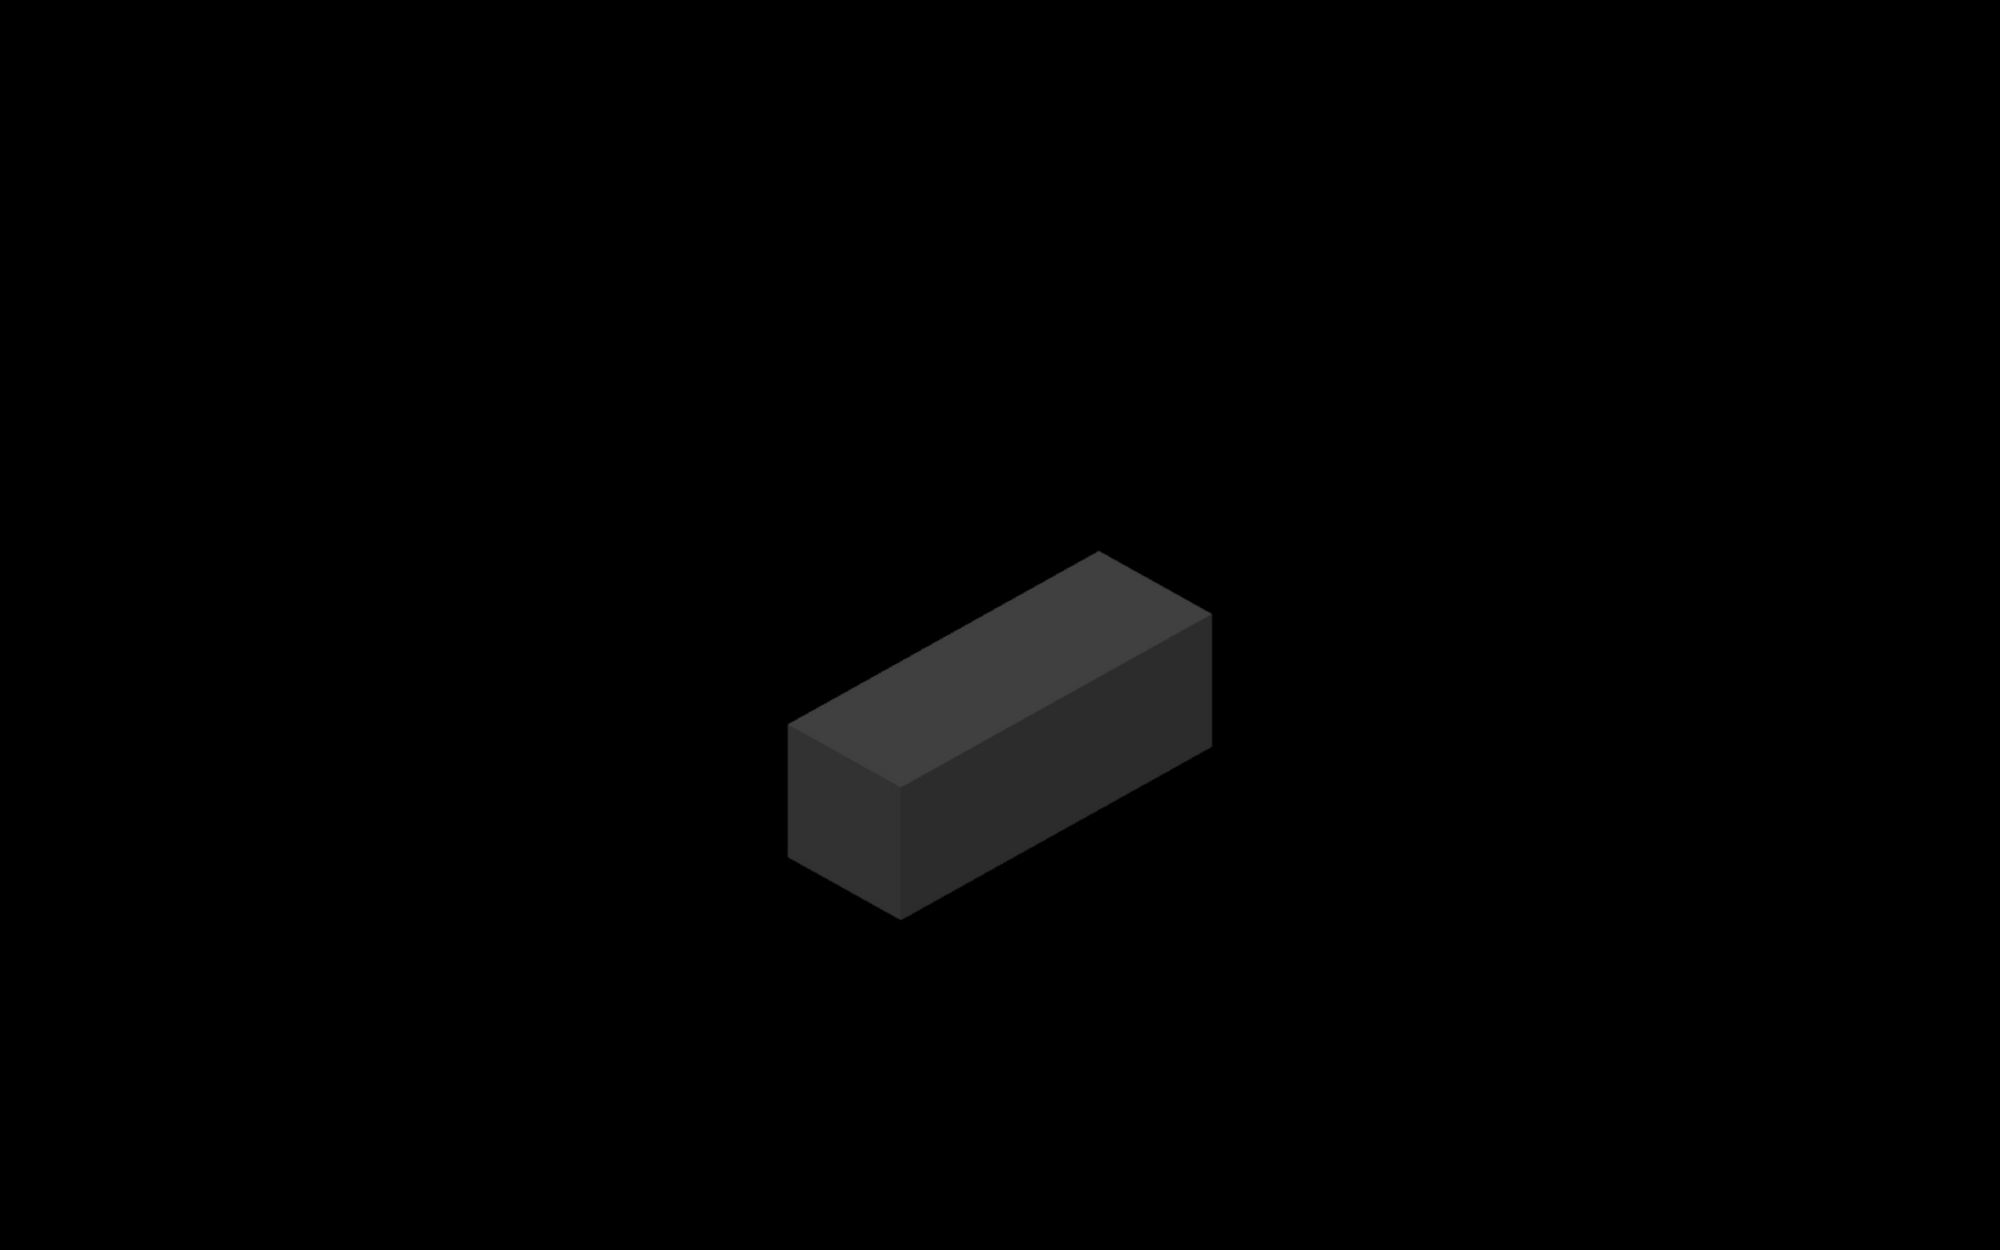
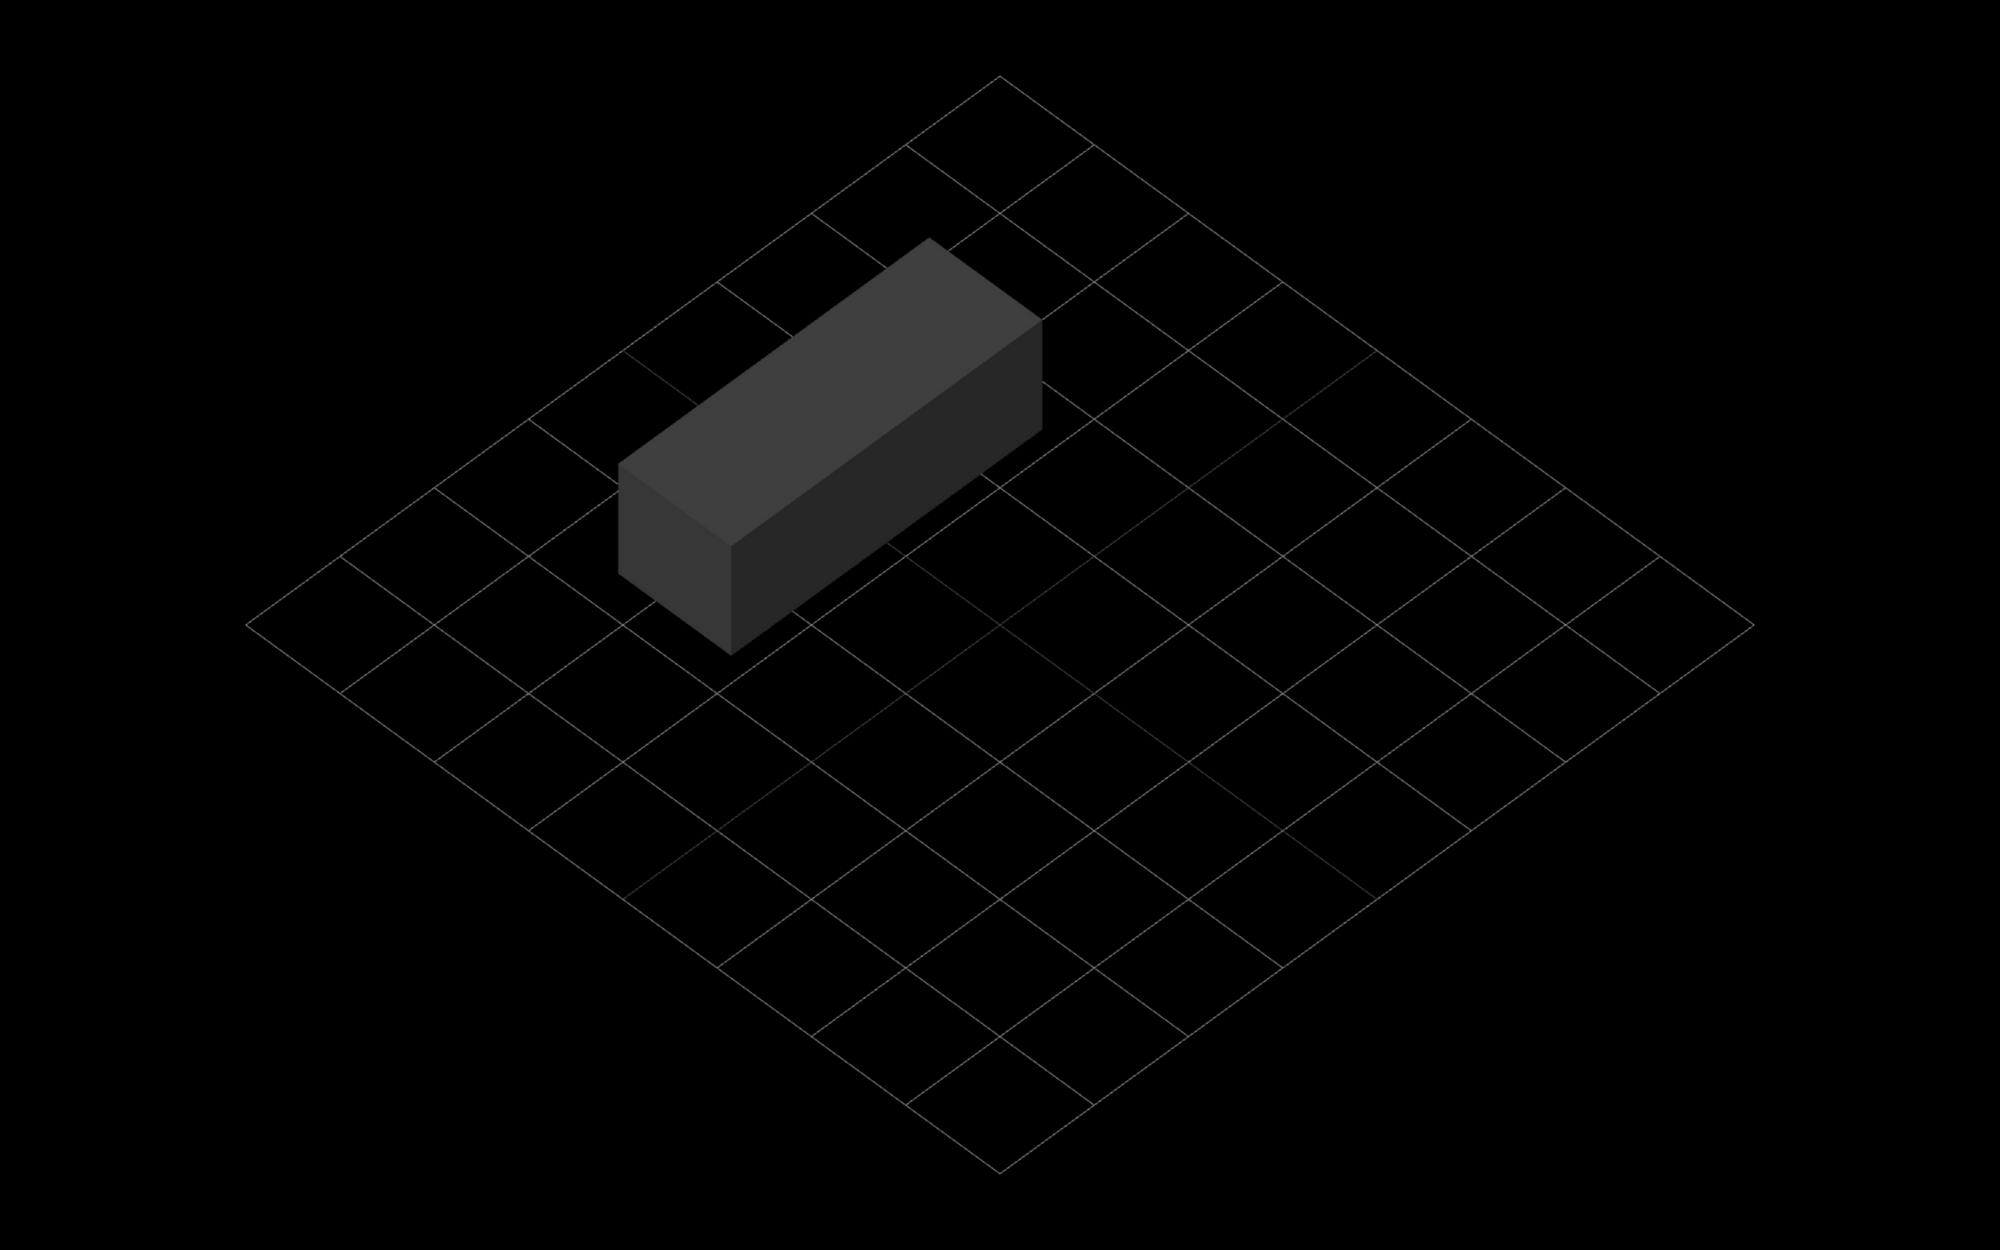
First, nosotros create a pair of wheels. We volition define a gray box that represents both a left and a right wheel. As nosotros never see the automobile from below, we won't observe that instead of having a separate left and correct wheel we simply have one large box.
We are going to need a pair of wheels both in the front and at the back of the car, so we can create a reusable office.
. . . office createWheels() { const geometry = new Three.BoxBufferGeometry(12, 12, 33); const textile = new Iii.MeshLambertMaterial({ colour: 0x333333 }); const wheel = new 3.Mesh(geometry, material); return wheel; } . . . We ascertain the bike as a mesh. The mesh is a combination of a geometry and a material and it will represent our 3D object.
The geometry defines the shape of the object. In this instance, we create a box by settings its dimensions forth the X, Y, and Z-axis to be 12, 12, and 33 units.
And so we laissez passer on a material that will define the appearance of our mesh. In that location are different material options. The main deviation betwixt them is how they react to light.
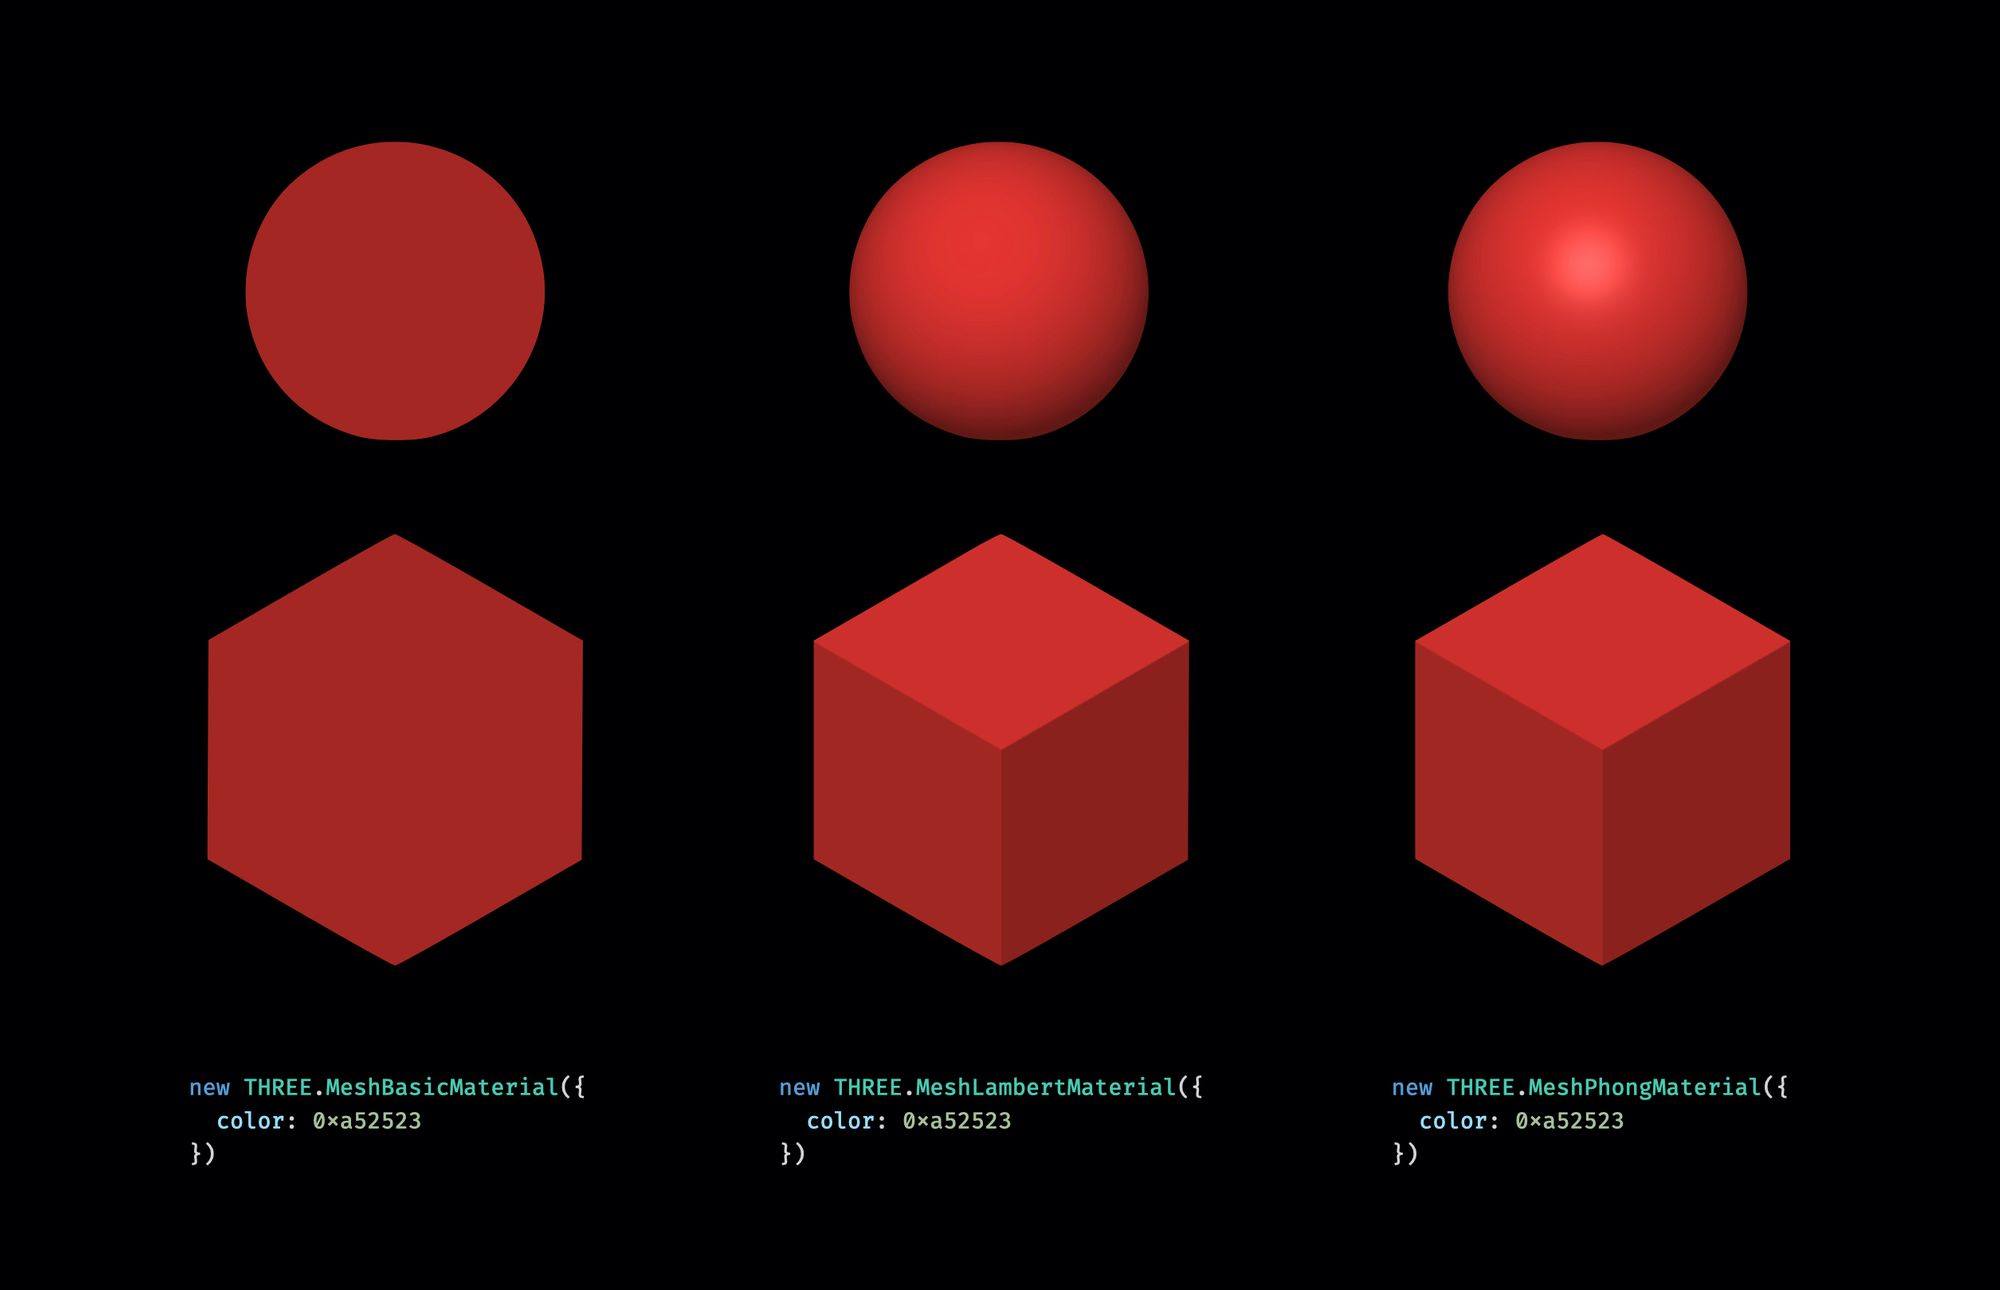
In this tutorial, we'll use MeshLambertMaterial. The MeshLambertMaterial calculates the colour for each vertex. In the case of drawing a box, that's basically each side.
We tin can see how that works, as each side of the box has a different shade. We defined a directional lite to shine primarily from above, so the height of the box is the brightest.
Another materials calculate the colour, non but for each side but for each pixel inside the side. They outcome in more than realistic images for more circuitous shapes. Just for boxes illuminated with directional light, they don't make much of a difference.
How to Build the Rest of the Car
And then in a similar way permit's let'southward create the rest of the machine. We define the createCar function that returns a Group. This group is another container like the scene. It tin agree Three.js objects. It is convenient because if we want to move around the car, we tin can simply motility effectually the Grouping.
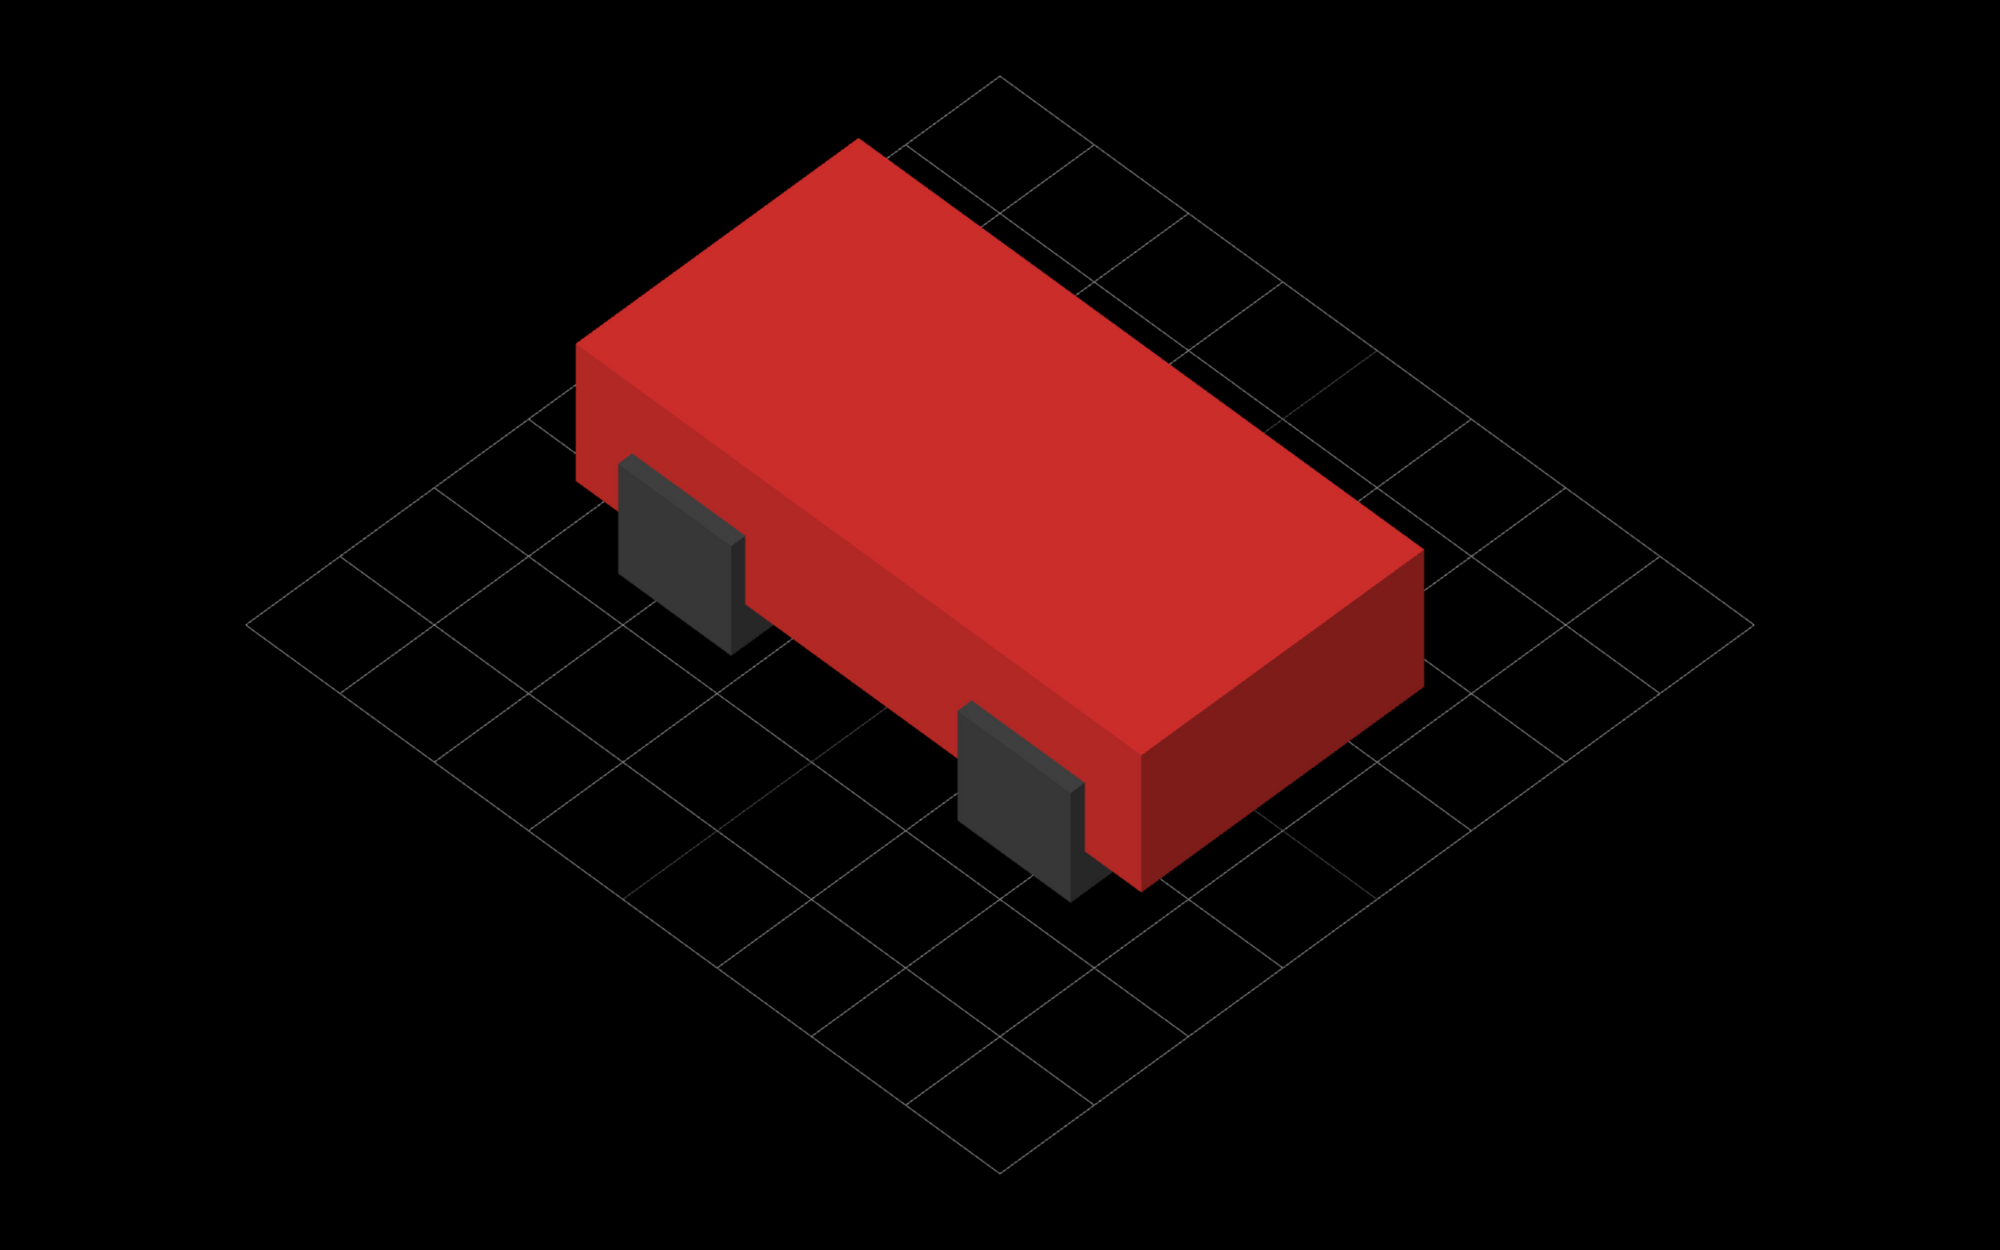
. . . role createCar() { const car = new Iii.Grouping(); const backWheel = createWheels(); backWheel.position.y = half dozen; backWheel.position.x = -eighteen; car.add(backWheel); const frontWheel = createWheels(); frontWheel.position.y = half dozen; frontWheel.position.x = 18; car.add together(frontWheel); const master = new 3.Mesh( new Three.BoxBufferGeometry(60, 15, 30), new THREE.MeshLambertMaterial({ color: 0x78b14b }) ); main.position.y = 12; auto.add(main); const cabin = new 3.Mesh( new THREE.BoxBufferGeometry(33, 12, 24), new 3.MeshLambertMaterial({ color: 0xffffff }) ); motel.position.x = -half-dozen; motel.position.y = 25.five; automobile.add together(cabin); return car; } const car = createCar(); scene.add(car); renderer.render(scene, camera); . . . We generate 2 pairs of wheels with our function, and then define the main office of the car. And then nosotros'll add the meridian of the cabin as the forth mesh. These are all but boxes with different dimensions and different colors.

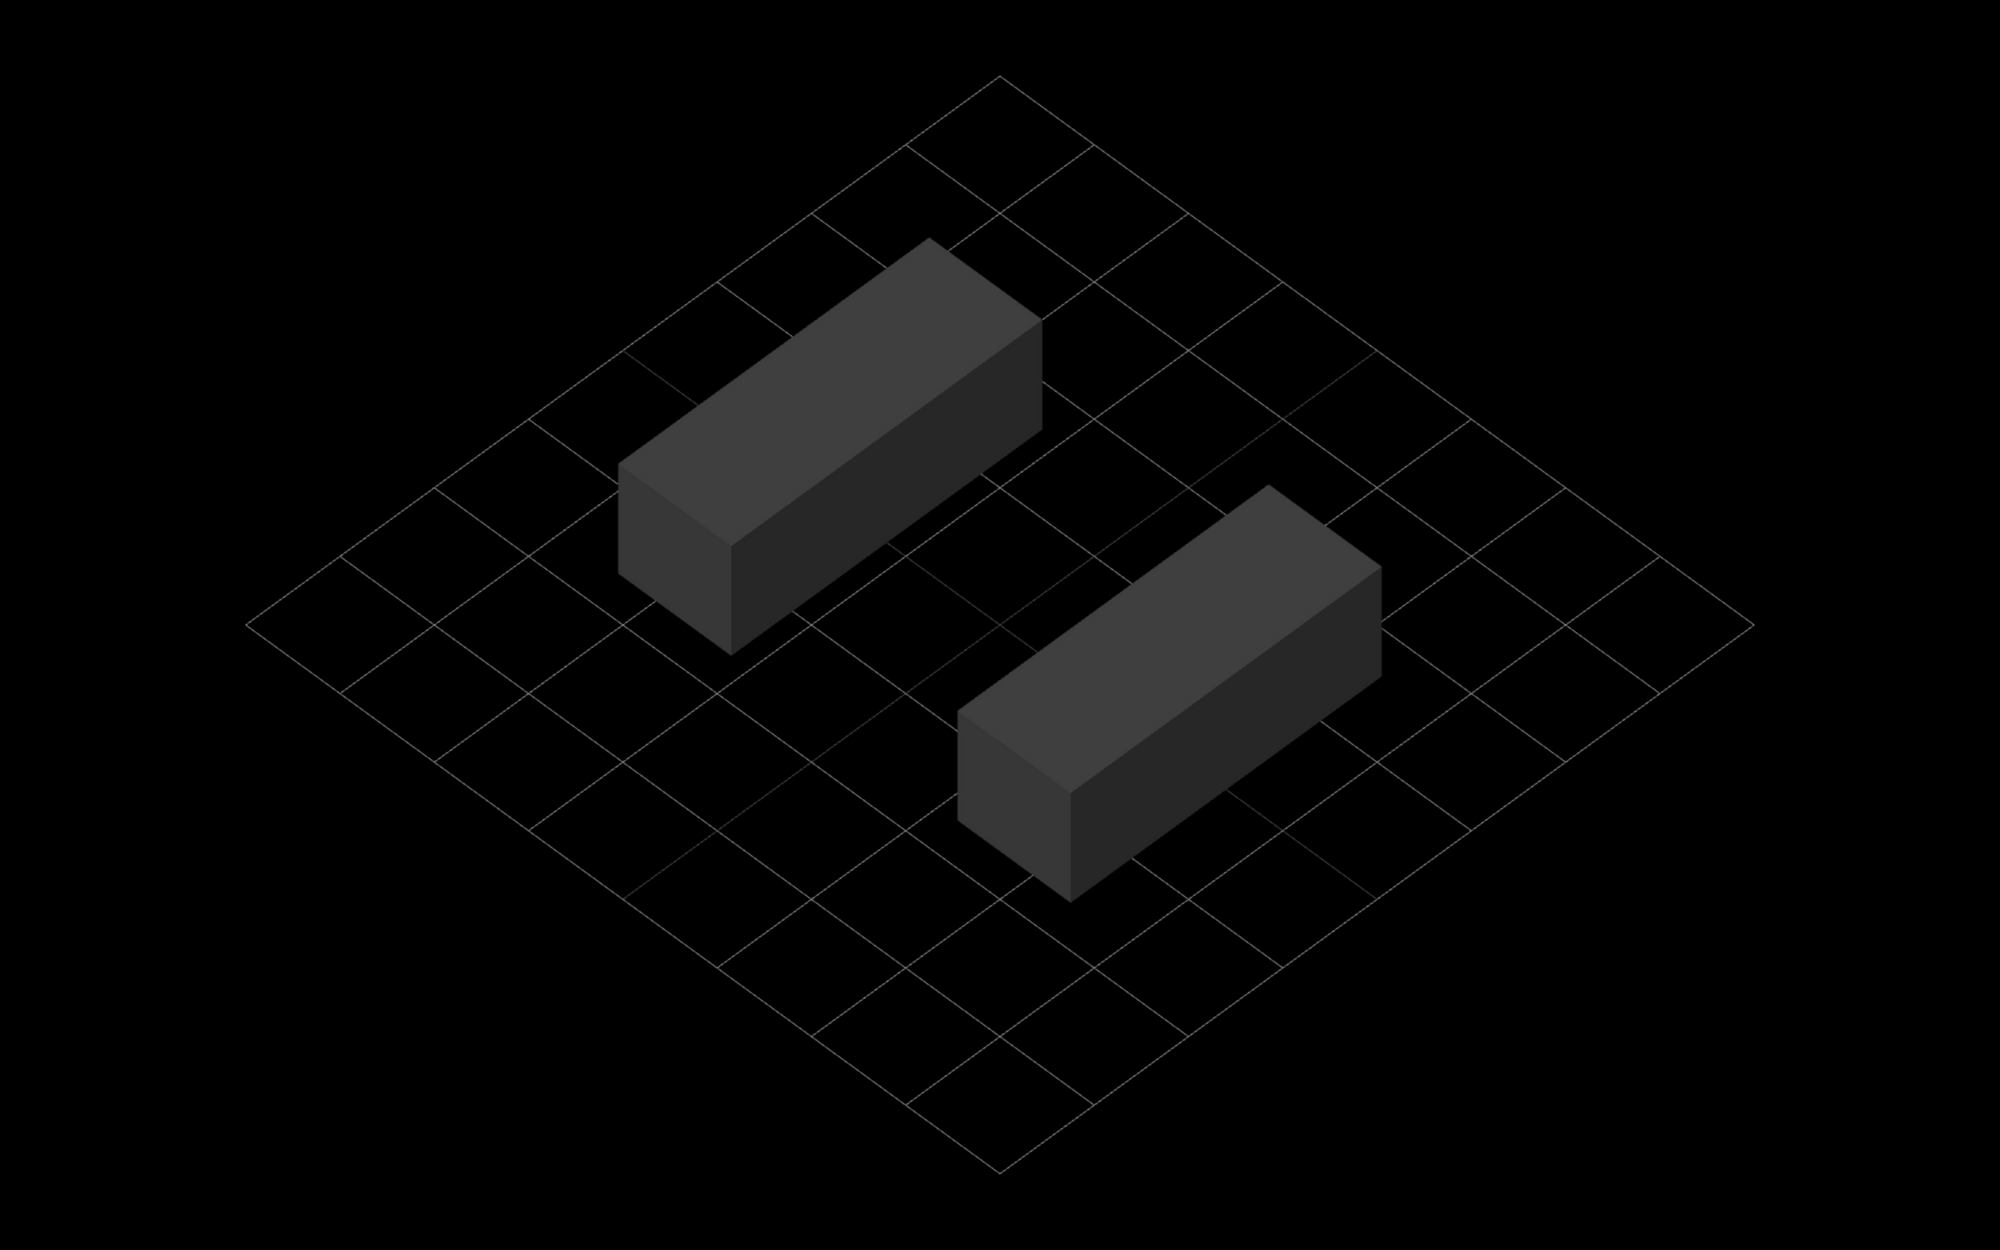
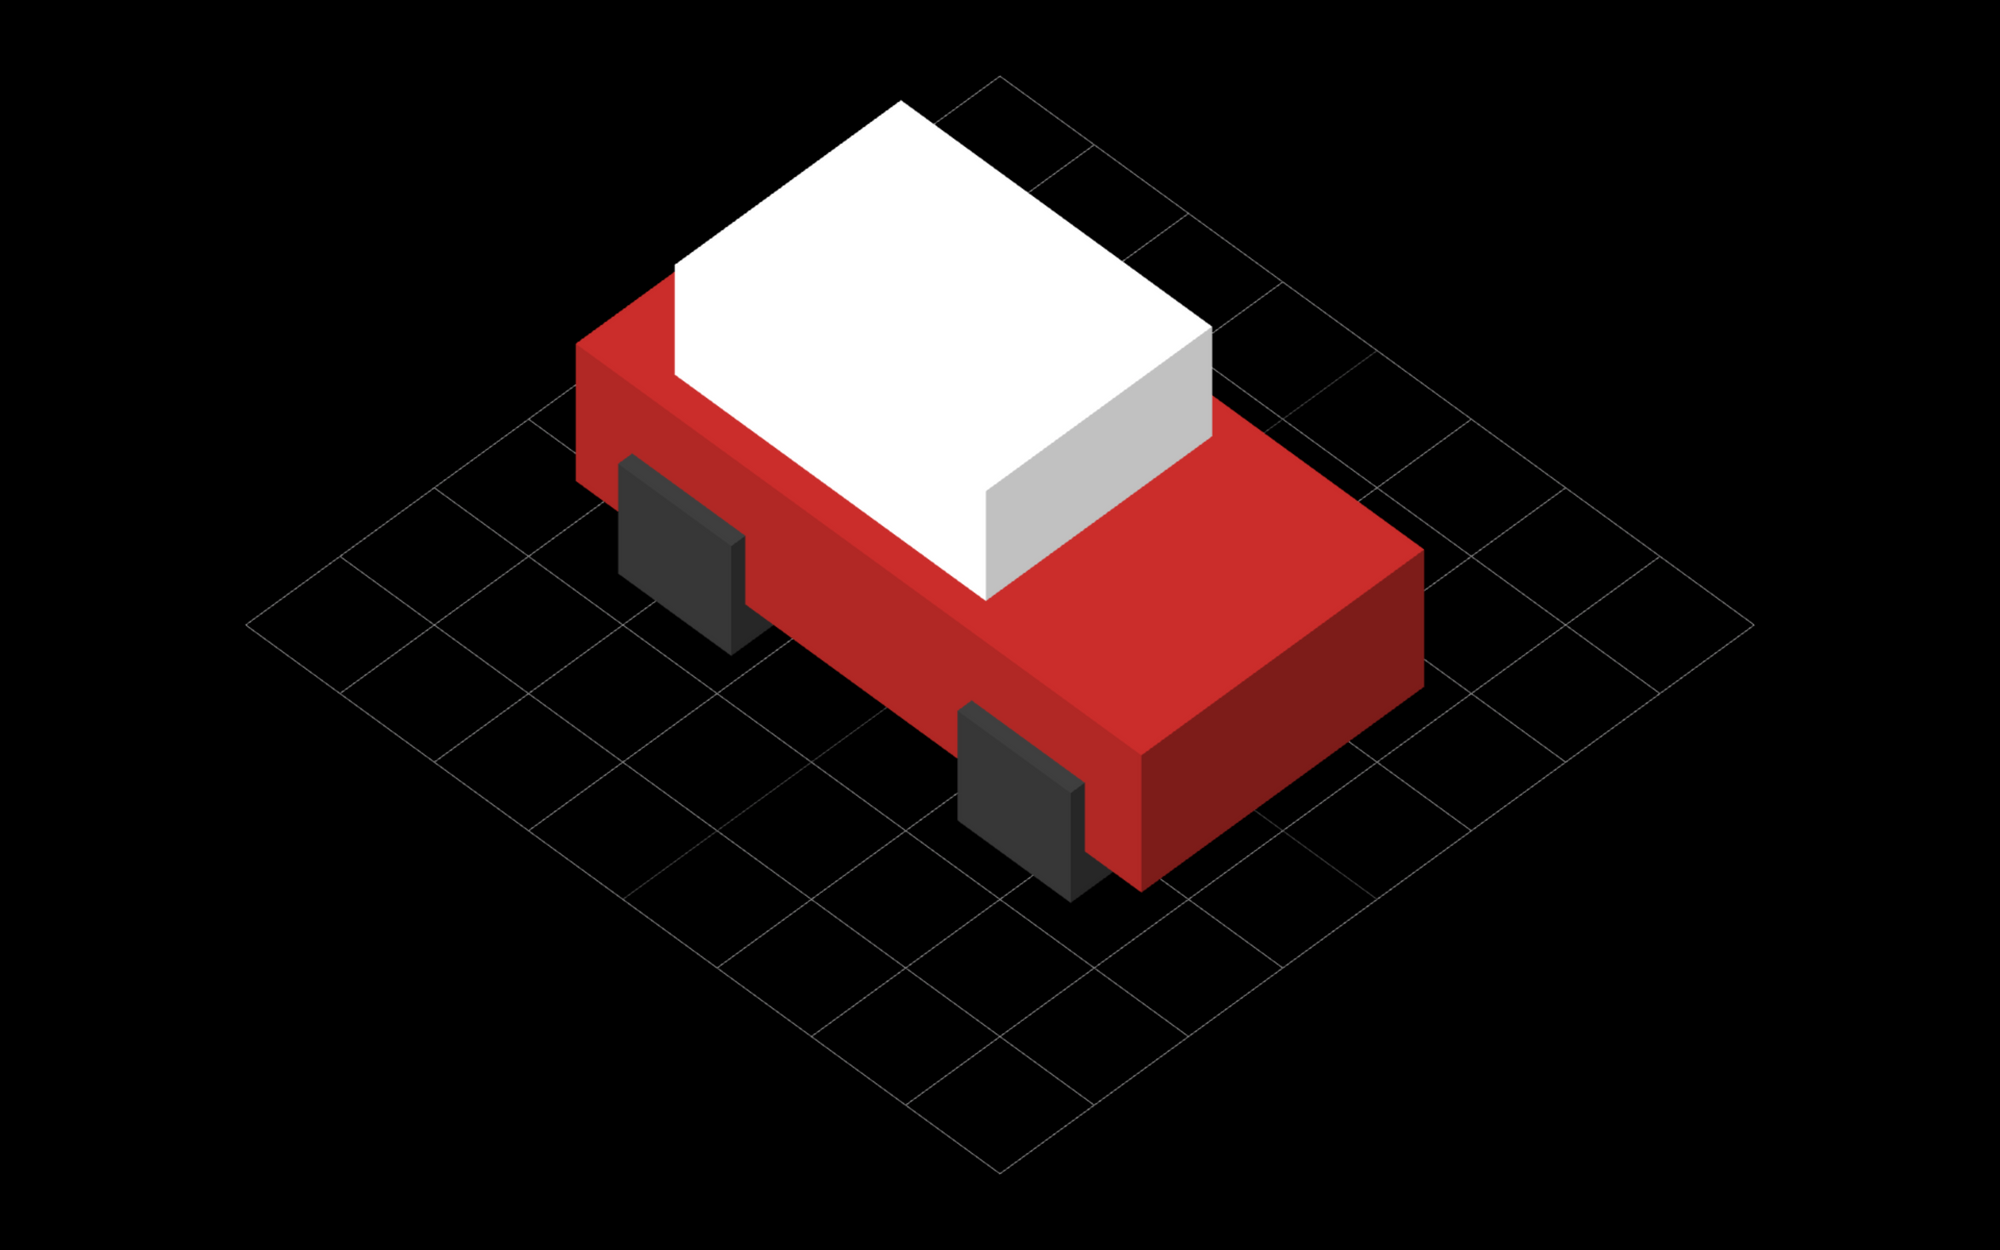
By default every geometry will be in the heart, and their centers will be at the 0,0,0 coordinate.
First, we raise them past adjusting their position forth the Y-axis. We raise the wheels past half of their top – then instead of sinking in halfway to the ground, they lay on the ground. Then we likewise adjust the pieces forth the Ten-centrality to reach their last position.
Nosotros add these pieces to the car group, then add the whole grouping to the scene. It's important that we add the automobile to the scene earlier rendering the paradigm, or we'll demand to call rendering again once nosotros've modified the scene.
How to Add Texture to the Auto
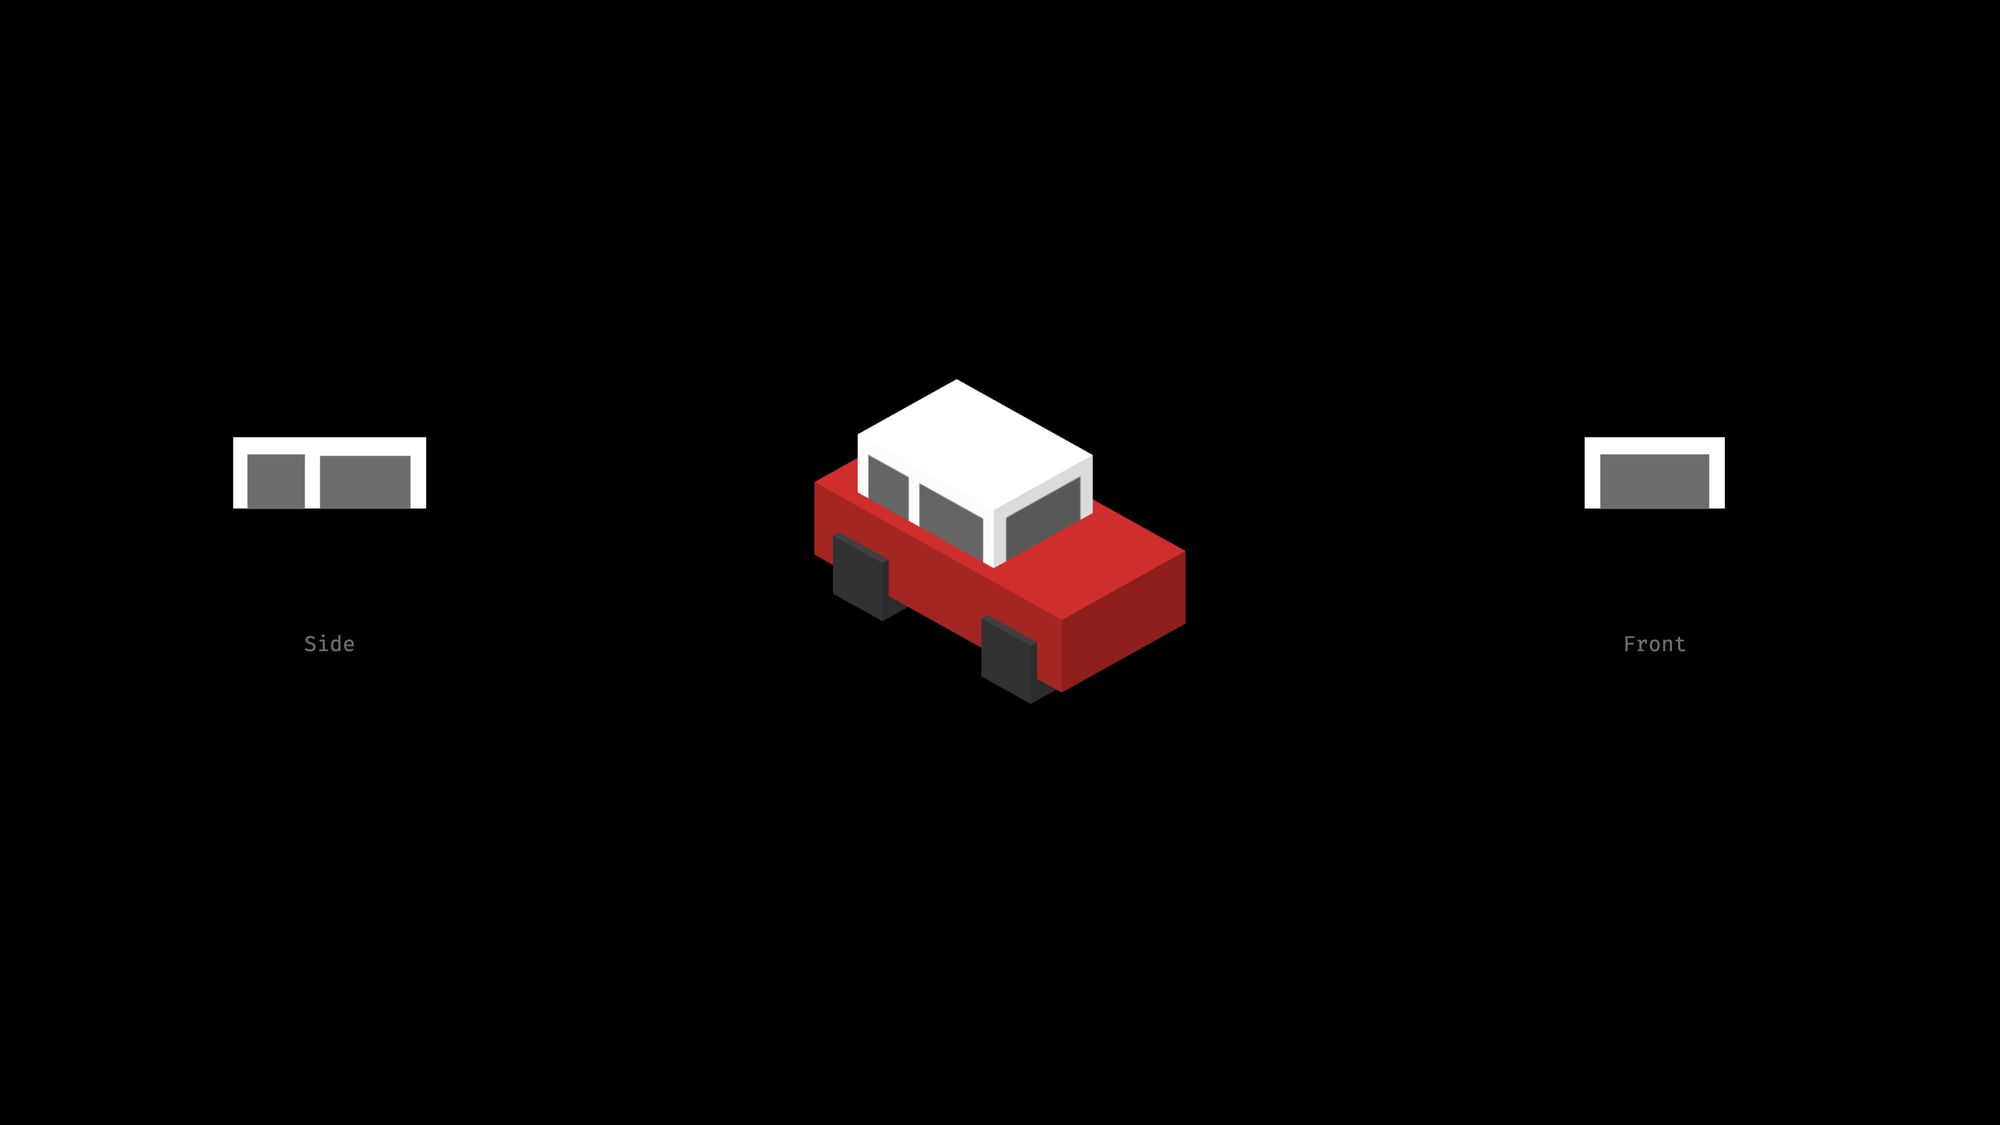
At present that we have our very basic car model, allow'south add some textures to the cabin. Nosotros are going to paint the windows. We'll define a texture for the sides and one for the front and the back of the cabin.
When nosotros ready the appearance of a mesh with a material, setting a color is not the merely pick. We tin as well map a texture. We can provide the same texture for every side or we tin can provide a textile for each side in an array.
Every bit a texture, nosotros could employ an image. But instead of that, we are going to create textures with JavaScript. We are going to code images with HTML Canvass and JavaScript.
Earlier nosotros continue, we need to make some distinctions between Three.js and HTML Sheet.
Three.js is a JavaScript library. It uses WebGL under the hood to return 3D objects into an image, and it displays the terminal result in a canvas element.
HTML Canvas, on the other manus, is an HTML element, just similar the div element or the paragraph tag. What makes it special, though, is that we can describe shapes on this element with JavaScript.
This is how 3.js renders the scene in the browser, and this is how we are going to create textures. Let's see how they work.
How to Draw on an HTML Canvas
To depict on a canvas, outset we need to create a sail element. While we create an HTML element, this chemical element will never be part of our HTML structure. On its own, information technology won't exist displayed on the folio. Instead, we will turn it into a Three.js texture.
Let'southward run into how tin can we draw on this sheet. Get-go, we define the width and tiptop of the sail. The size here doesn't define how large the canvas will appear, it's more than similar the resolution of the canvas. The texture will exist stretched to the side of the box, regardless of its size.
office getCarFrontTexture() { const canvas = document.createElement("canvass"); sheet.width = 64; canvas.superlative = 32; const context = canvas.getContext("second"); context.fillStyle = "#ffffff"; context.fillRect(0, 0, 64, 32); context.fillStyle = "#666666"; context.fillRect(8, 8, 48, 24); render new THREE.CanvasTexture(canvas); } Then nosotros get the 2D cartoon context. Nosotros tin use this context to execute drawing commands.
First, we are going to fill the whole canvas with a white rectangle. To exercise and so, kickoff we set the fill way to be while. Then fill a rectangle by setting its top-left position and its size. When drawing on a canvas, past default the 0,0 coordinate volition exist at the top-left corner.
Then we fill some other rectangle with a gray color. This one starts at the 8,8 coordinate and it doesn't fill up the canvas, it only paints the windows.
And that's it – the last line turns the canvas chemical element into a texture and returns information technology, so we can apply information technology for our auto.
function getCarSideTexture() { const canvas = document.createElement("canvas"); canvas.width = 128; canvas.height = 32; const context = canvas.getContext("second"); context.fillStyle = "#ffffff"; context.fillRect(0, 0, 128, 32); context.fillStyle = "#666666"; context.fillRect(x, 8, 38, 24); context.fillRect(58, 8, 60, 24); return new 3.CanvasTexture(canvas); } In a similar fashion, nosotros tin define the side texture. Nosotros create a canvas element again, nosotros get its context, then first fill up the whole canvass to take a base color, and and so draw the windows as rectangles.
How to Map Textures to a Box
Now let's see how tin can we use these textures for our automobile. When nosotros define the mesh for the tiptop of the cabin, instead of setting but one material, we prepare one for each side. Nosotros define an array of six materials. We map textures to the sides of the cabin, while the peak and bottom will even so take a manifestly color.
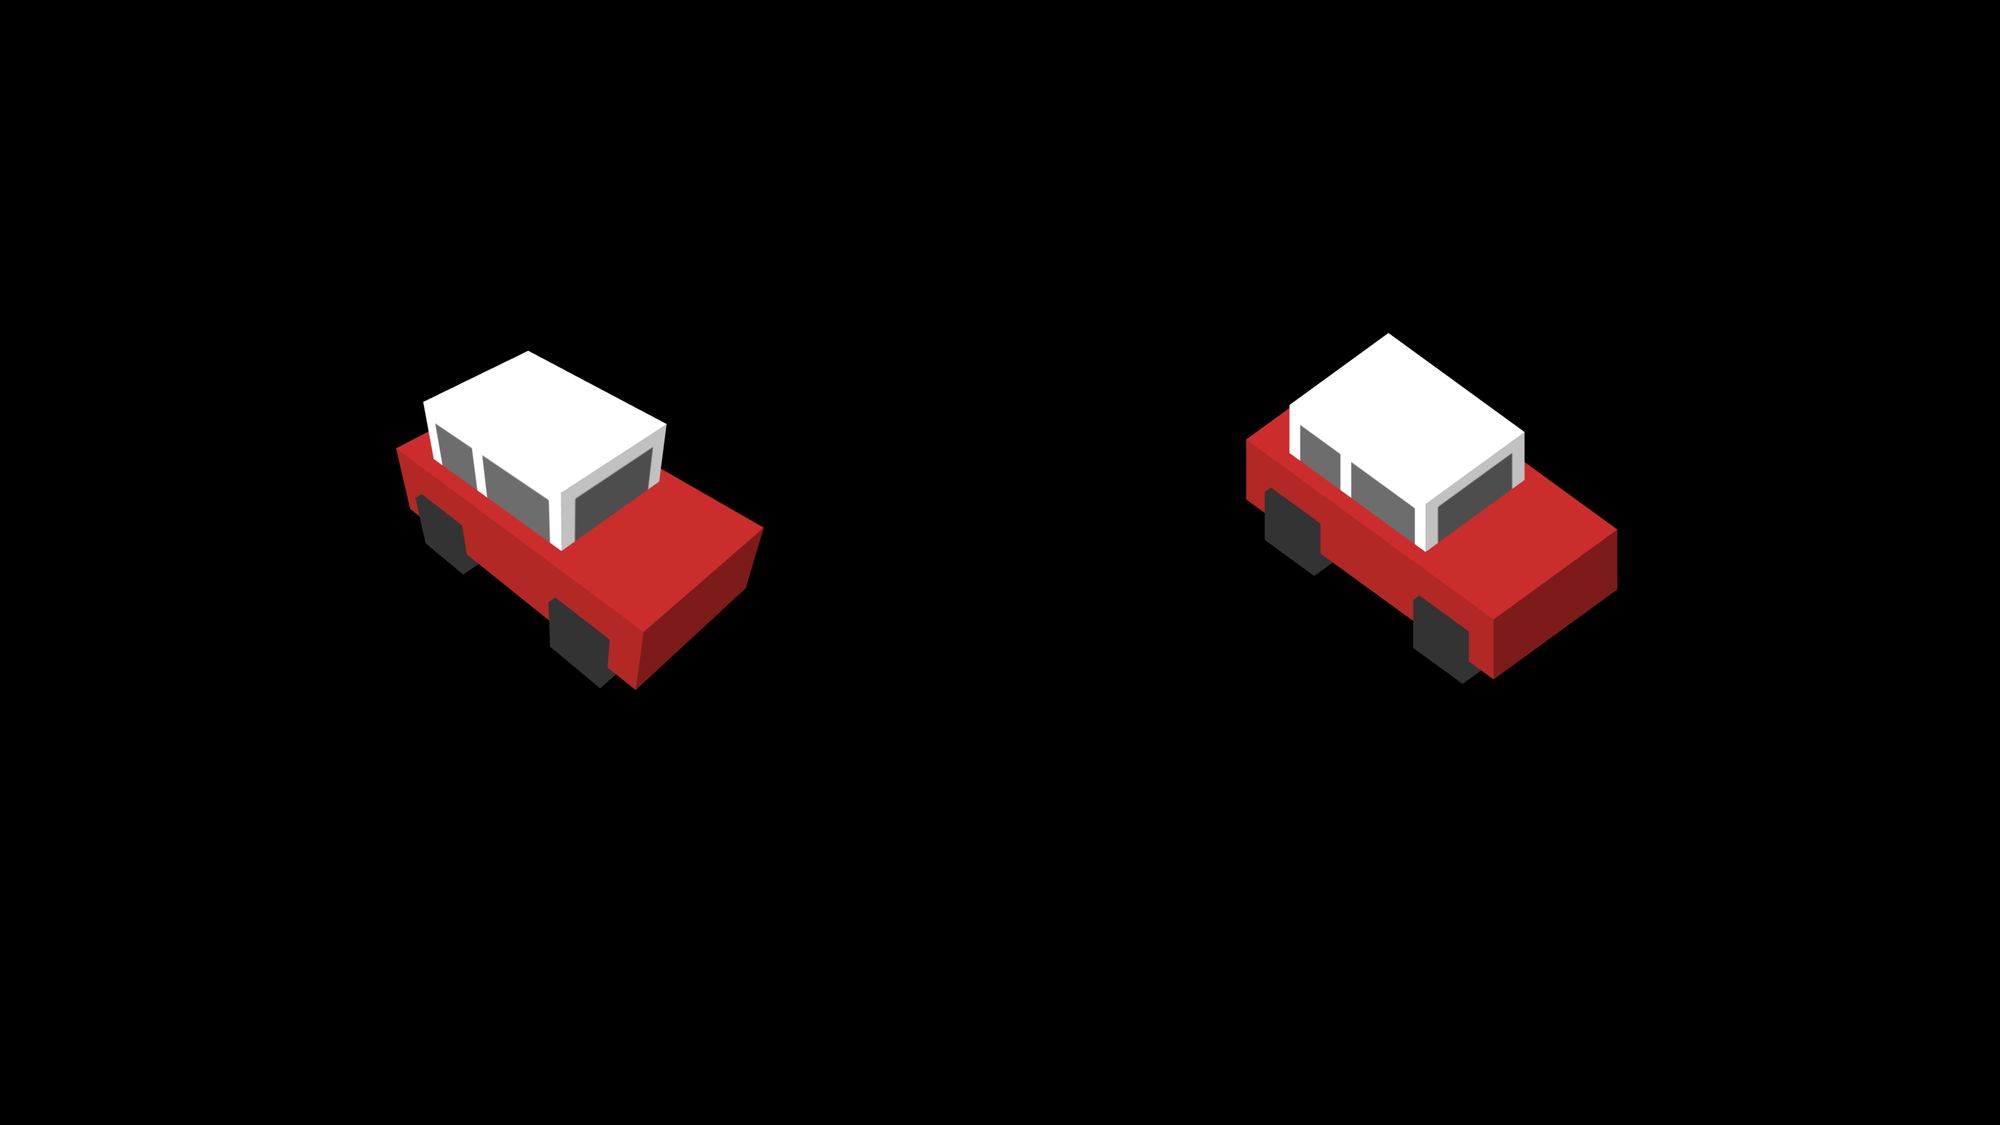
. . . part createCar() { const car = new THREE.Group(); const backWheel = createWheels(); backWheel.position.y = 6; backWheel.position.10 = -18; car.add(backWheel); const frontWheel = createWheels(); frontWheel.position.y = 6; frontWheel.position.x = eighteen; car.add(frontWheel); const main = new THREE.Mesh( new THREE.BoxBufferGeometry(60, xv, thirty), new 3.MeshLambertMaterial({ color: 0xa52523 }) ); chief.position.y = 12; auto.add(main); const carFrontTexture = getCarFrontTexture(); const carBackTexture = getCarFrontTexture(); const carRightSideTexture = getCarSideTexture(); const carLeftSideTexture = getCarSideTexture(); carLeftSideTexture.center = new THREE.Vector2(0.5, 0.5); carLeftSideTexture.rotation = Math.PI; carLeftSideTexture.flipY = false; const cabin = new Iii.Mesh(new THREE.BoxBufferGeometry(33, 12, 24), [ new Three.MeshLambertMaterial({ map: carFrontTexture }), new THREE.MeshLambertMaterial({ map: carBackTexture }), new Three.MeshLambertMaterial({ color: 0xffffff }), // meridian new Iii.MeshLambertMaterial({ color: 0xffffff }), // bottom new 3.MeshLambertMaterial({ map: carRightSideTexture }), new THREE.MeshLambertMaterial({ map: carLeftSideTexture }), ]); cabin.position.x = -half-dozen; cabin.position.y = 25.5; car.add together(cabin); return motorcar; } . . . Most of these textures will be mapped correctly without whatsoever adjustments. But if nosotros turn the car around then we tin can run across the windows announced in the wrong club on the left side.


This is expected equally nosotros use the texture for the right side here too. We can define a separate texture for the left side or we can mirror the right side.
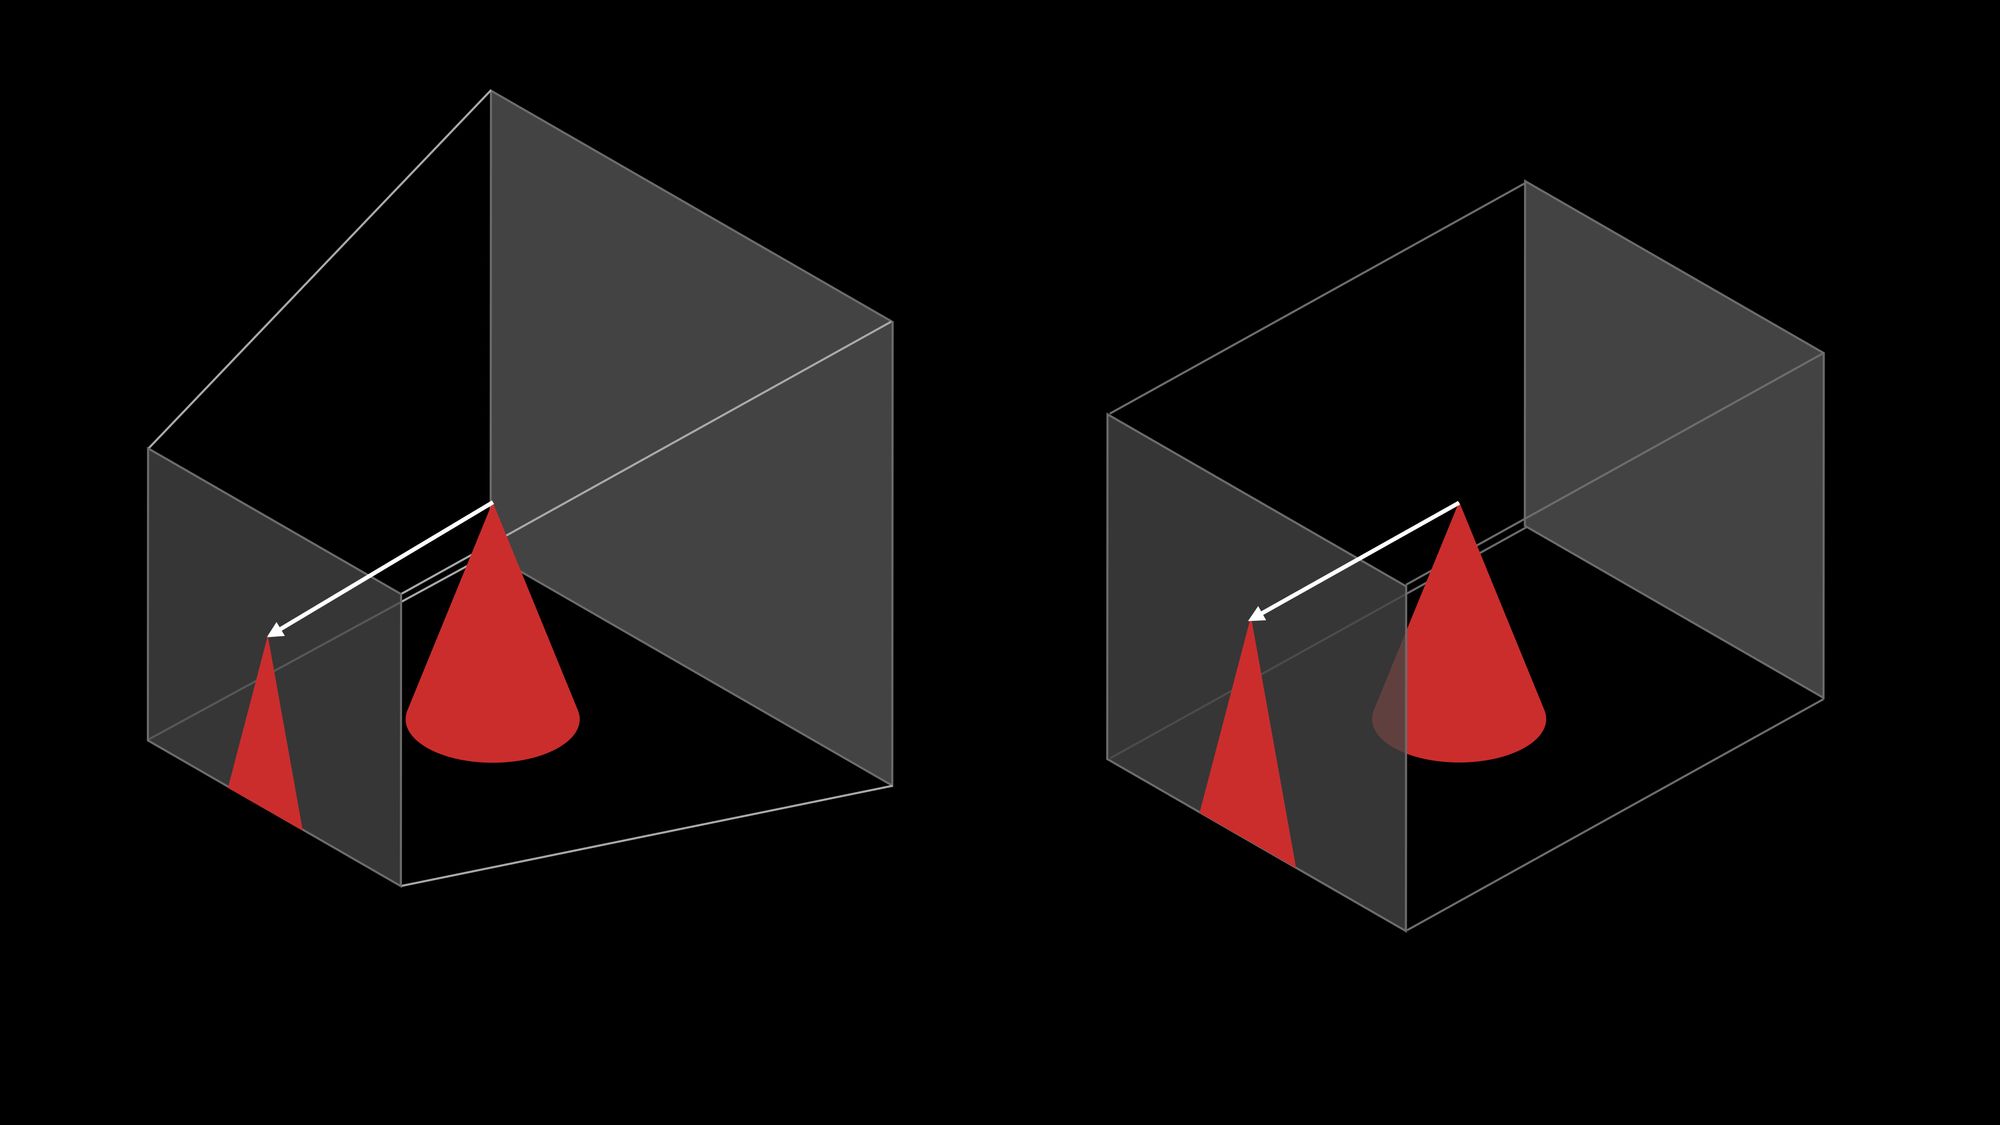
Unfortunately, we can't flip a texture horizontally. Nosotros can merely flip a texture vertically. We tin ready this in 3 steps.
Get-go, we plow the texture around by 180 degrees, which equals PI in radians. Before turning it, though, nosotros have to brand sure that the texture is rotated around its middle. This is non the default – we have to fix that the center of rotation is halfway. We set 0.5 on both axes which basically means l%. So finally we flip the texture upside down to accept it in the correct position.
Wrap-up
So what did we do here? We created a scene that contains our auto and the lights. We built the machine from simple boxes.
You might retrieve this is too basic, just if you think about information technology many mobile games with stylish looks are really created using boxes. Or just think almost Minecraft to run across how far you can get past putting together boxes.
Then we created textures with HTML canvas. HTML canvas is capable of much more than what we used here. Nosotros can draw different shapes with curves and arcs, but so again sometimes a minimal pattern is all that we need.

And finally, we defined a camera to establish how we look at this scene, as well as a renderer that renders the terminal image into the browser.
Next Steps
If you want to play around with the code, you lot can find the source code on CodePen. And if you want to move forward with this projection, so check out my YouTube video on how to turn this into a game.
In this tutorial, nosotros create a traffic run game. Afterward defining the car we draw the race track, we add game logic, consequence handlers, and blitheness.
Learn to code for free. freeCodeCamp'due south open source curriculum has helped more 40,000 people get jobs equally developers. Get started
Source: https://www.freecodecamp.org/news/three-js-tutorial/
0 Response to "how to draw a 3d box in java"
ارسال یک نظر